Table of Contents
Tips: Using renderable splines
One of the object types that Lasershow Converter MAX can render is a spline1). This is a “shape object” in 3ds Max that you can use to draw freeform objects or lines anywhere – even over other objects. You can also control the thickness of these splines.
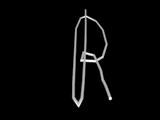
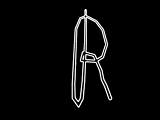
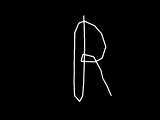
Lasershow Converter MAX will render any shape object as long as it has its Renderable property enabled. The result will be double-trace outlines or single-trace outlines, depending on the spline Thickness setting.
 |  |  |
| Original rendered spline Thickness = 2.0 | Lasershow Converter MAX Thickness = 2.0 | Lasershow Converter MAX Thickness = 0.001 to 1.0 |
Note that just like everything else in 3ds Max, splines can be animated. This means that you can make animated dancing characters, fire and other things that change with time.
What is "renderable"?
The word “renderable” can be confusing in 3ds Max. The “Renderable” property appears in multiple places within 3ds Max. The same word “renderable” has different meanings, depending on which dialog box you have opened.
To make a spline renderable, you must check the Renderable check box, found in the General section of the 3ds Max Modifier tab, as shown below.

Recommended Spline settings for best laser results
If you look closely above, the Renderabe check box is checked. This will make the spline output to the laser and the Lasershow Converter MAX preview window.
Typically, if you use a Thickness value of 1.0 or lower, Lasershow Converter MAX will render the spline as a single thin stroke on the laser. (This is generally the desired result.) However, some modifiers can artificially increase this Thickness value, including the SurfDeform modifier. For this reason, we recommend that you use a Thickness value of 0.001, especially if you use 3ds Max modifiers in conjunction with Splines.
- Note that if you use a Thickness of 0.0, you may see a very thin spline, or no spline, depending on the version of 3ds Max you are using. Therefore Pangolin does not recommend that you use a Thickness value of 0.0.
- Also note that sometimes, when you try to enter “0.001”, 3ds Max will change this to 0.0. If this happens, try entering 1.0, and then press Enter, and then enter 0.001. If that doesn't work, then use 0.01 instead. Different versions of 3ds Max behave in different ways…
As a final recommendation, look closely at the Interpolation Steps section shown above. Here you can see that the Steps is set to 6. Generally, a value between 4 and 6 provides pretty smooth results on the laser. If you use a higher value, it probably will not increase smoothness or rendered quality of the laser output, but the rendering time will increase dramatically!
Object Quick-Setting for renderable splines
Splines are best rendered using customized settings in Lasershow Converter MAX. The easiest way to get these settings is to first select your spline(s), then click one of the two buttons at the bottom of the Object quick-setup panel. One button is for lines and smooth splines. The other is for lines and splines with sharp corners. Additional details about recommended settings are below.
Recommended Object filter settings
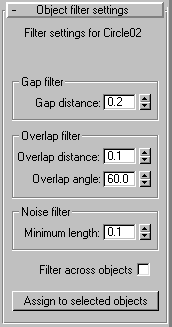
If you intend to use renderable splines to create just a single laser line, you may need to assign an object filter setting to that object. The recommended filter settings for renderable splines are shown below:

Recommended Object point spacing settings
The Object quick-setup buttons will establish very conservative settings for splines which generally result in a lot of laser points being used. If you only have a few splines in the scene, the Quick object settings work pretty well. But if you have many splines in a scene, or the whole scene is made up of splines, we recommend that you revert to the default settings of Lasershow Converter MAX, as shown below (with the exception of the path setting, which is best set to Circular optimization for splines). Note that you can quickly return to the default settings just by right-clicking on each spinner control.

See Also
A spline model is defined as: “Representing 3-D objects as surfaces made up of mathematically derived curves (splines).”
In 3ds Max, splines can be used to control camera paths and to control object manipulations. In addition, splines can be made renderable and therefore can produce a visible outline.