
Tools
Support
Pangolin Family of websites
Pangolin Laser Systems, Inc.
Kvant Lasers
Unity Lasers
ScannerMAX
Lasorb
Tools
Support
Pangolin Family of websites
Pangolin Laser Systems, Inc.
Kvant Lasers
Unity Lasers
ScannerMAX
Lasorb
This section allows you to control the frames generated by Lasershow Converter 4D.

Allows you to enter text that will be assigned to each frame rendered by Lasershow Converter 4D. This framenote can be used in BEYOND to search for frames.
When frames are created, the Cinema 4D frame number will be appended to this text. In the example above, the framenote for the first frame would be “LC4D Frame 1”, the framenote for the second frame would be “LC4D Frame 2”, etc. Note that the frame number used in the framenote is NOT the BEYOND frame number, but the Cinema 4D frame number.
You might notice that the time slider in Cinema 4D starts at from 0, and works its way up from there. Since it is not possible to write laser frame 0 in BEYOND, this is handled as described below:
Since the Starting Frame Number is permanently set to 1, both frame 0 and frame 1 in Cinema 4D will render to BEYOND frame 1. This makes it so that frame 1 in C4D corresponds with frame 1 in BEYOND, frame 2 in C4D corresponds with frame 2 in BEYOND, etc.
This sets the minimum number of laser points rendered in each frame. This could be handy for keeping the frame rate consistent. For example, if Minimum points was set to 1000 points, you would always get a maximum of 30 frames per second if the sample rate (point output speed) was set to 30,000 points per second.
Here is another example: Say you have an animation of scrolling text. When only a few letters are on the screen, only a few points would be generated as needed to represent those letters. As more letters scroll onto the screen, more points would be required. If you play back an animation where the number of points is changing, this would result in the brightness and scrolling speed changing while the animation was playing. You can indicate that you always want to generate some minimum number of points, thus controlling the brightness and speed of the animation.
If the rendering results in fewer than the Minimum points being generated, the remaining points are put in a blanked line that leads from the last point back to the first point in the frame.
This option allows you to specify which zone will be used for the rendered scene.
This allows you to specify whether Z-axis data will be included in the laser frame output. If this check box is not checked, then the Z-axis data is always set to 0.0 in the frames. When this is checked, then Z-axis data is included in accordance with other parameters contained in this panel.
For the quickest and easiest results, the plugin can simply automatically center the output on the Z-axis. This is the best choice to use when you want to use the Z-axis data for special effects in BEYOND.
Alternatively you can specify an exact Z-axis coordinate – in 3ds Max coordinates – that will correspond with “0.0” on the laser.
Similar to the Z-Offset options above, the Z-axis output may be automatically scaled to the typical laser coordinate space. Alternatively, you may specify the scale factor coorespondence between 3ds Max coordinates and laser coordinate space.
This tells the plugin to show the number of points in the laser frame, along with the Front-most Z-axis and Rear-most Z-axis in the presently selected C4D frame. This information is shown in the C4D Viewports as well as the rendering window. The Z-axis information is particularly helpful when using Beam Brush.
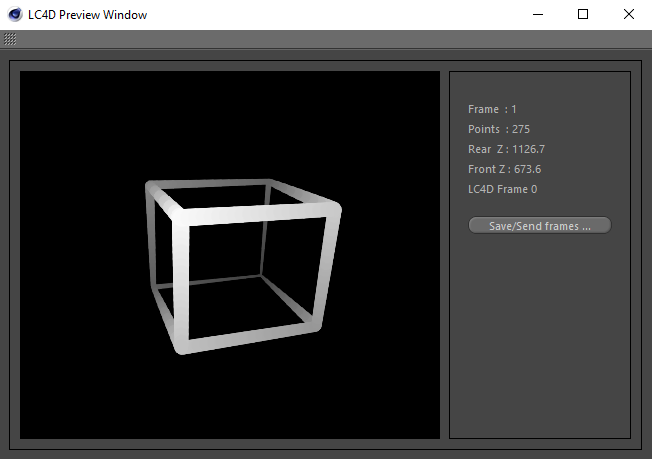
This button allows you to preview the laser frames, and also provides additional information.
When this window is opened, you will see the laser frame in the preview window. You will also see it projected on the laser projector as you move the time slider in Cinema 4D. If you press Play in Cinema 4D, you will see the complete animation in the preview window and also on the laser projector. (Note that the laser output seen on the laser and in the preview window will only correspond to the Cinema 4D scene if the respective frames have already been rendered.)
In addition to laser preview and display, this panel also gives information about the current frame, number of points in that frame, and the framenote for that frame, and the Front and Rear Z-axis coordinates.
This panel allows you to save the rendered animation and send the frames to the presently-selected cue in BEYOND.