Tools
Support
Pangolin Family of websites
Pangolin Laser Systems, Inc.
Kvant Lasers
Unity Lasers
ScannerMAX
Lasorb
Tools
Support
Pangolin Family of websites
Pangolin Laser Systems, Inc.
Kvant Lasers
Unity Lasers
ScannerMAX
Lasorb
The TC4000 is a SMPTE Timecode converter, It converts analog timecode SMPTE to Midi Timecode (MTC) via USB. This allows for connection as a midi device, allowing for simultaneous input and output of LTC. Because Its over midi, there is no need for an extra driver for this unit, and will work with windows drivers out of the box.
Beyond can receive incoming timecode in the following ways:
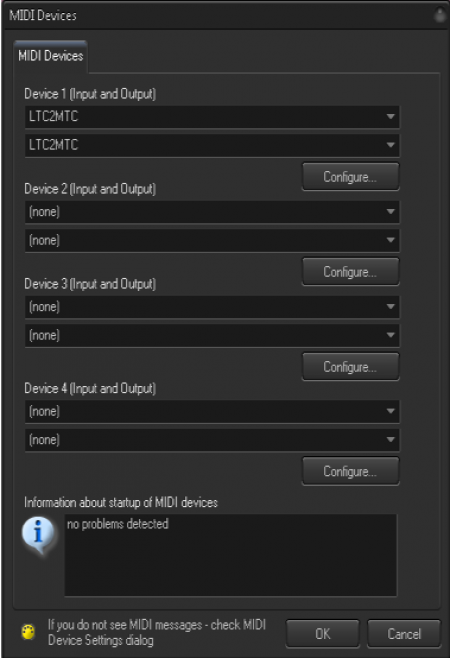
When using TC4000 you are going to be using MIDI - MTC (Input and Output)
<WRAP center round tip> IMPORTANT NOTE: There was a small production run of the TC4000 that was labeled LTC2MTC, this device Is exactly the same as the TC4000 and has the same exact setup and running procedures as the TC4000. </WRAP>
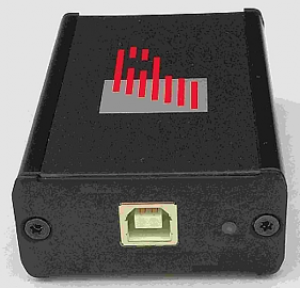 | 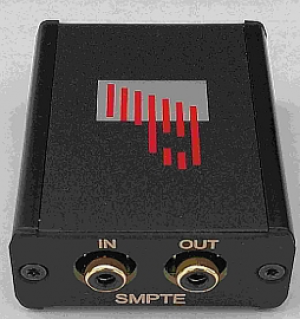 |
On one side we have a USB port, and an RGB status LED, On the other side we have RCA input and output for our Audio LTC, this is slightly different then the TC2000 as the TC2000 had 3 leds on the USB Port side.
The Timecode for MIDI does not require any special configuration. the type of incoming timecode will be detected automatically

Confirmation of incoming timecode will be shown in the preview window and look like the figure above. The RGB LED on the TC4000 will turn RED.
If you have never used timecode before, next section is the setup for timecode overall.
Before you can use timecode In beyond at all, you will need to go into your configuration and setup all timecode settings the way you would like to use It.
To Setup:
This will give you the window below.
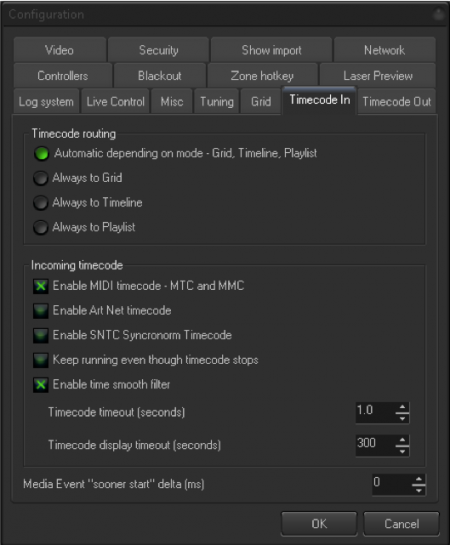
Here you can choose settings for your timecode.
Under Incomming Timecode, you must Click “Enable MIDI Timecode - MTC and MMC” for TC4000 to work.
You can also enable other types of incomming timecode in this window.
Some Other Timecode options within this window are described below:
“Keep running even though timecode stops” - when this option enabled, BEYOND will continue the show playback even if the incoming timecode signal is lost, or stopped. This option allows the show to continue playback even if there are some drops in timecode signal. When this option is disabled, BEYOND will stop the show playback after 1 second of timecode signal timeout.
“Enable time smooth filter” - BEYOND can use the time (from timecode) directly. The time value coming from the Timecode Controller will be used over and over again until a new value has been received. An alternative solution is based on BEYOND detecting the timecode speed and following the time code as close as possible. In this situation, BEYOND will not just wait for next time code value, it will continue to play the show based on the Timecode speed it detected. As a result the time is always going forward and moves smoothly. The time smooth filter should be enabled in most cases, except when you need the show to within an exact time.
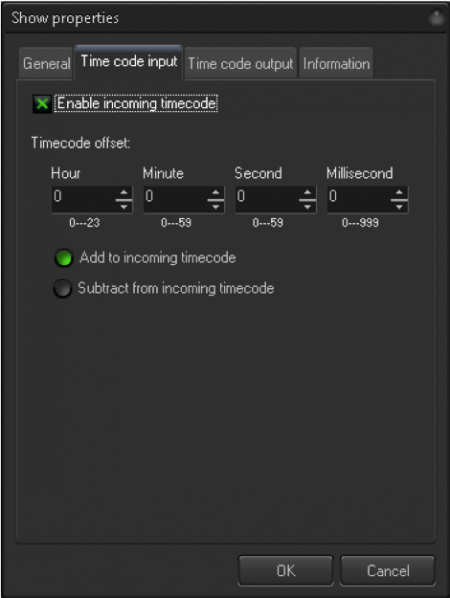
To enable time code within a timeline show, you must right click on the show tab, and click show properties. Then you can select timecode input.
Once “Enable incoming timecode” is clicked, the show will begin to follow incoming timecode.
This must be enabled for every timeline you want to follow timecode, be sure to save your showfile once you have enabled timecode on a show. This is also required if you save the show into a cue of the workspace. And in that case, the cue must be depressed to listen for timecode.
Once you click Okay, a new button on the top bar will be visible:

The TC-IN button has been added, this button when clicked, will have the show following timecode, when unclicked, the show will not react to timecode. This Is for both programming, and safety purposes.
<WRAP center round important> Important: Timeline shows ignore timecode If the time value is out of bounds </WRAP>
BEYOND only allows for one source of Incoming timecode, this includes the timecode from Media in the timeline. If you have media in your timeline, like video or audio, and your Incoming timecode Is not perfect, you can have issues with synchronization. Due to this, it Is recommended that beyond output timecode and be the source if the main media file is coming from BEYOND and not another show master within the system.
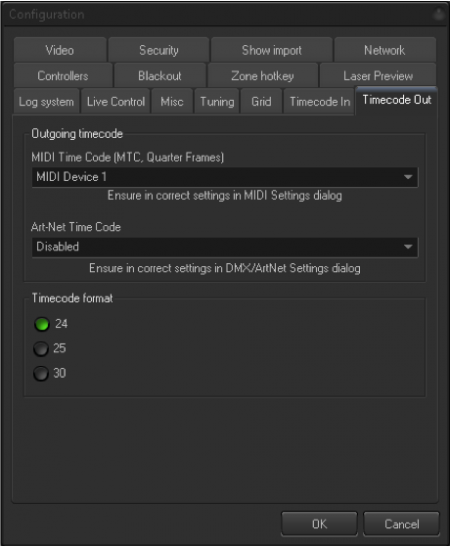
To setup Timecode out with TC4000, go to Settings > Configuration > Timecode out.
Here you can select a midi device number (set to whatever device you set your TC4000 to in Midi settings window) and decide on a timecode format.
To output Timecode from a Timeline, you must: Click on a timeline show tab > Right click > show Properties > Time code output and click “Enable outgoing timecode”
Then when you play the show, you should output timecode on the same timeframe that your show Is.