This is an old revision of the document!
Table of Contents
Using Effects in BEYOND
Most laser content images are static (unmoving) unless they are part of a multi-frame animation (multiple frames in sequence to give the appearance of movement). The main way you would make a static frame into a single frame animation is to apply an effect to the laser content. This document will explain the use of the Effect Editor to accomplish this.
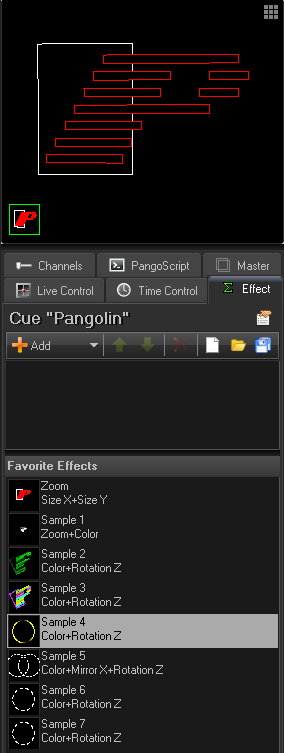
The Effect Editor in BEYOND is found on the right side of the BEYOND interface, under the preview window, and within other editors where it is required.
Since the Effect Editor is a shared resource, the Title inside Effect tab tells you what the Effect Editor is currently working on.
The Effect Editor “E” icon can also be see in cues.
To add a new effect, just click on Add button. Alternatively, you can double click on one of the Favorite Effects from the library under Effect Editor.
At the right side of the effect Title, there is the “Effect Properties” button that will open a corresponding dialog box for additional effect properties.
Oscillating effect
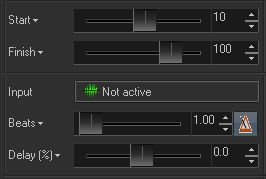
Oscillating effects are made for continuous motion between definable Start and Finish positions. The duration of the effect motion can be set in Time (seconds) or in Beats. The Clock icons means Time based; the Metronome icon means Beat based. The Start, Finish and duration (Beats/Time) are the main adjustable parameters for oscillating effects. All oscillating effects use this logic.
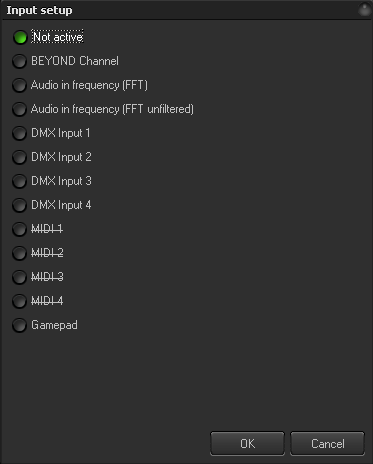
Input - instead of time based oscillating motion, BEYOND allows the use of external data, such as MIDI, DMX, Kinect, Audio analyzer, or Channels to control aspects of an effect. Effect positioning between the defined Start and Finish values will depend on the value of the inputed data. For example, a MIDI controller has values in the range of 0 and 127. When a value from the controller is 0, the Effect will be in Start position; when the value is 64, the Effect will be in the middle and when the value is 127, the Effect will be in the Finish position. The same logic works for all input types. BEYOND receives the range of input values, normalizes the input values, then calculates the Effect.
Delay - is a phase control adjustment that is measured in percent.
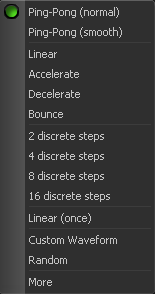
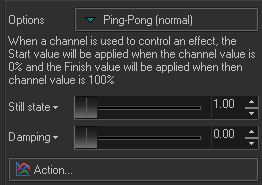
The Options button offers a variety of wave forms to define the acceleration of the effect, or how the value will go from Start to Finish; the default option is a linear waveform. There are a variety of options such as Accelerate, Decelerate, Ping-Pong, Discrete steps, Random, and Finally - Custom Wave form. Custom Wave is a waveform that you draw or paint yourself. In ST2000 the parameter has the name “Rate of Change”.
Still State will inject a static state into the waveform. Default state is 1, which means that the waveform is not modified. A value of 2 means that one part of the waveform is original and the second part is a static state. A good way to visualize this is in the Timeline editor where it paints the waves for Oscillating effects.
Damping decreases the amplitude of an effect as it runs. BYEOND uses an exponential ratio for this calculation. A value of 0 means no damping at all. A bigger value means that the effect will start to oscillate slower.
Action is an advanced Effect Property. See corresponding Chapter.
In Timeline mode Oscillating Effect has options Stretch mode and Repeat mode. Stretch means that effect duration depend on Event duration, Effect fit into the Event Repeat mode mean that effect period depends on time only, same as it plays in the Cue or other place.
Key effect
A ‘Key effect” is an effect based on a sequence of key states. There may be one or more states and an interpolation in between. There is a simple timeline, and each key state can be placed at any position (by time).
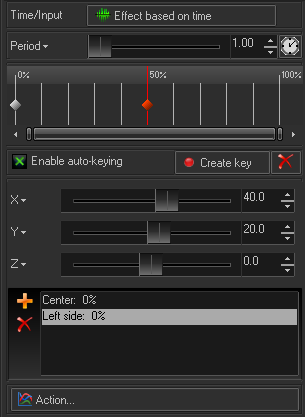
Time/Input - define how Effect should work, depending on Time/Beat or on Input. See chapter with oscillating effect that discuss Input, or Input dialog.
Period - defines the duration of the key effect in Seconds or Beats.
Timeline - Double click on the simple timeline to create a Key. The Context menu of a Key offers a couple of simple operations like Delete, Lock, and a list of Wave forms (rate of change). Each Key has its own setting. BEYOND offers a few standard wave forms, same as Custom Wave Form. This section is the same as in an Oscillating Effect. The context menu with wave forms is also available in main Timeline (timeline mode).
Enable auto keying - will create a key, in current time position, if you change the effect parameter. In other words, if you put the timeline cursor into desired position, and move the effect parameter slider, BEYOND will create a key automatically where your cursor was on the simple timeline.
Create Key - create a key in simple timeline at the current cursor position
Delete - Delete selected Key.
Effect parameters panel depends on the effect type. There is one typical parameter - Action. Action is sort of a morph between the frame before and after the effect is applied. It will define how much the effect is applied. Each effect has a different implementation of this action; sometimes BEYOND will morph the effect parameters, sometimes BEYOND will morph the frames
Presets - For each key effect there is list of presets. A Preset is a simple container for effect values where you can save your frequently used states. Right now this is just a constant. In addition to Add and Delete buttons there is a Context menu that has commands such as Update, Rename, Add and Delete
Action is an advanced Effect Property. See corresponding Chapter.
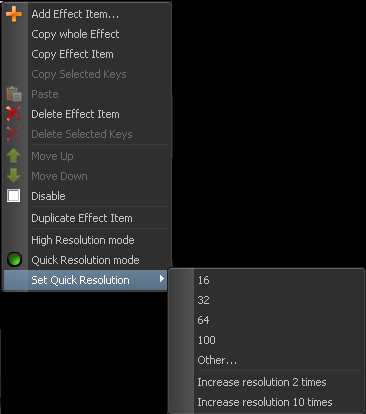
The Key effect time resolution is controllable when working in BEYOND Timeline mode. If you click on the Effect line in a Timeline show, the bottom of the context menu will show:
High Resolution Mode - resolution of effects same as for Events, more than 1/1000 of second.
Quick Resolution Mode - “present”, 100 time divisions.
And menu Set Resolution with options - 16, 32, 100, Other… you can set the resolution to what you want. Low resolution has the advantage of making it faster to set a key into the right position. It works fast and with no mistakes. High resolution is important in timeline shows, but it takes more time to place the key effect into an exact position.
Color Effect, Brightness Effect, Power Effect
BEYOND has a group of 3 effects controlled from one Effects menu. The Color Effect changes (replaces) the RGB values, the Brightness effect modifies the RGB values used in controlling the level of specific dolor channels, and the Power Effect injects additional Anchor points to increase the power (brightness) in laser content. The Power effect can inject up to 10 anchor points into each point where it is used.
Gradient/Color line
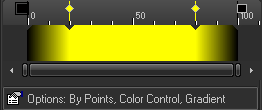
The Color effect is similar to a key effect. There is a sequence of color-keys that compose a gradient or a sequence of colors. Double-click within the color area to create a new color-key. The Gradient area also has a context menu. The top bar of the gradient line allows you to choose the color of the color keys and are for changing the position of the keys.
The Color line creates a color pattern that can be applied to the laser content in several different ways specified within the Options button.
The Options button gives access to a menu for defining how to apply the color effect to the laser content.
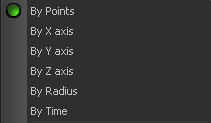
By points - depending on the linear order of points within the frame. First point is the start of the pattern; last point is the end of the pattern.
By X axis - based on the X coordinate of the portion of the laser content (horizontally)
By Y axis - based on the Y coordinate of the portion of the laser content (vertically)
By Z axis - based on the Z coordinate of the portion of the laser content (backward-forward)
By Radius - based on the distance from center of the laser projection area
By Time - uses the pattern as a sequence of colors, where one color will be applied to a the whole frame.
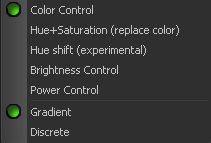
Color effects have a few modes; the basic modes are available from Add menu, but a few are specific, and they are “hidden” in Options menu.
Color control - effect completely replaces the original color of incoming frame.
Hue+Saturation - (replace color) - effect keeps the brightness level and changes only the Hue and Saturation
Hue Shift - effect uses the Hue component of the color pattern and adds it (shift) to the Hue of incoming frame points. A Hue effect creates a circle where red is in the beginning and has value 0. If the incoming pattern has a value of “red”, then the effect will not cause a visual change in the output.
Brightness control - controls the brightness only.
Power Control - inserts anchor points to increase the brightness of the content.
Gradient - color pattern change uses a gradient (smooth change between key-colors)
Discrete - color patterns is a sequence of fixed colors, no gradient in between
Repeats - define how many times to apply the color pattern to the laser content.
Speed - scrolling speed of the color pattern
Time shift - phase control.
Alpha Blend - defines a mix between the original frame color and the effect color.
Action Start - defines a start area, from where the effect can be applied. Before the start, the effect has no action
Action End - defines an ending area, from where the effect can be applied. After the end, the effect has no action
Bypass - protects a part of an incoming frame from the effect. This parameter works well with Time Shift (phase control). For example, you can apply a color effect first to a half of frame (bypass = 50), and apply a second effect to the second half of frame (bypass=50%, shift = 50%).
Speed Options button is just like the Options button in an Oscillating Effect and offers a variety of wave forms to define the acceleration of the effect, or how the value will go from Start to Finish; the default option is a linear waveform. There are a variety of options such as Accelerate, Decelerate, Ping-Pong, Discrete steps, Random, and Custom Wave form. Custom Wave is a waveform that you draw or paint yourself. In ST2000 the parameter has the name “Rate of Change”
Action is an advanced Effect Property. See corresponding Chapter
Alpha Blend - alpha blend is designed to be used with and external Effect Input. “Input” can be used in variety of places and will allow for external control of effect actions. For more information on this please check the Input documentation.
Filter effect
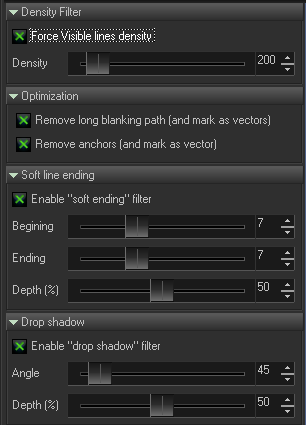
Density Filter
Enable Visible Line density. Enable this filter to ensure the density of lines with visible points is not less than the specified value in “Density”. Some effects create a distortion of point distance; on occasion such distance can be too big and problematic for output. This filter can transform Vectors to Points, which can be important for Color effects, or surface mapping effects.
Optimization
Remove long blanking path - removes sequential blanking points and replaces them with only one blanking vector.
Remove anchors removes all anchor points and marks the points as vectors. Vectors are optimized at the end of the calculation path.
Both of these options are a sort of dynamic re-optimization of the laser content. If you replace the blanking path by a vector, and also change the anchor points to “vectors”, then this creates a “semi vector” frame from any laser content. The visible points stay as they were when the content was created; all blanking and start/end anchors are under control of the optimization system within BEYOND.
Soft line ending - Beginning and Ending define a number of points of visible polyline endings that will be modified by an effect.
Depth defines a level of to decrease the brightness of a line.
Drop Shadow Creates a 3D light effect.
Enable “Drop shadow” effect to turn on this effect.
Angle - angle of the light.
Depth - amount of effect.
Zone Chase Effect
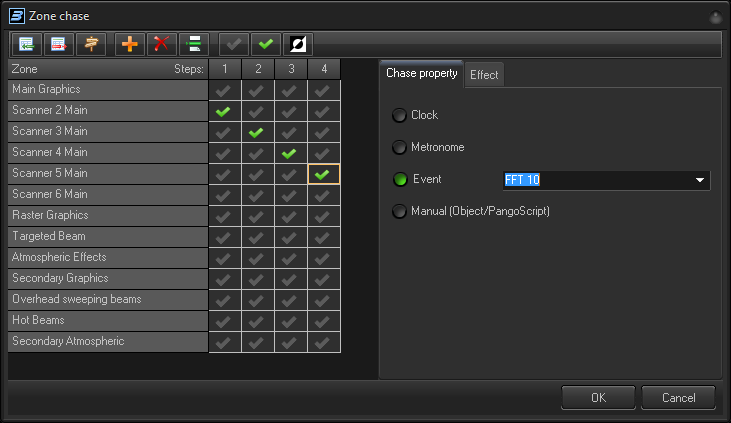
The Zone chase effect works with the zone/routing information of the laser content. As a rule, effects operate with the RGB values or XYZ coordinates of points of the laser content. Each frame has two additional parameters - scanrate and routing. A Zone chase effect redefines the routing information for an animation. Within the Zone Chase settings menu, the number of steps in the chase and the number of zones used in the effect are editable.
The Zone effect options include:
Add row - add a row into chase; each row represents a route to one or more projection zones.
Delete row - deletes current row
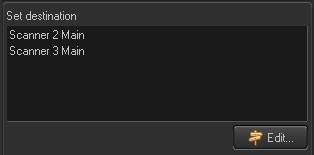
Edit row - edits the row destination route
Add Step - adds a step to the chase
Delete Step - deletes a step from the chase
On, Off, Toggle - the row grid allows you to select multiple cells (by using the Shift key). Once multiple cells are selected you can click the On, Off or Toggle button to change all the selected cells.
Chase property
Clock - The chase speed is defined by Time (seconds). Value is the duration of one step. Metronome - the chase speed is defined by Metronome (beats). Value is the duration of one step. Event - In the drop down selector you can pick one of standard names listed or enter your Own Event name. Entering your Own Event name is used for using PangoScript. Manual - this is for using PangoScript to control the chase property. The step index will be controlled by PangoScript
Effects in Chase
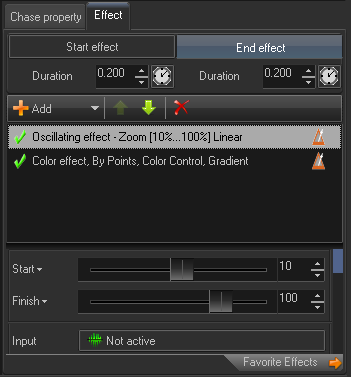
Chase effects are essentially an Effect within an Effect. For example, we can define how laser content will appear in a zone, and how it will disappear. This is implemented simply by defining some period of time in beginning of the step for BEYOND to apply a start effect during and then another effect before the end of the step.
Start Effect and corresponding Duration control the starting effect
End Effect and corresponding Duration control the ending effect.
Zone routing (Zone math)
Only a Man who read the Manual deserves to know a secret, why FX in BEYOND has 6 lines instead of 4. The answer is Effect based routing. People who do not read Manual will set the routing in the Cue, or do endless clicks in NxN Preview window. That is not bad, but there is “plan B”.
Effects can change the projection zone routing of laser content. When you play the Cue from the workspace grid you can change the routing by means of an effect. You cannot do this by means of NxN Preview window… AND the Cue Properties in realtime. The answer is to make an Effect. In BEYOND, extra FX lines have been added for routing control.
Set Zone - removes routing information of incoming laser content and redefines the routing based on its own settings. This is simple redirection.
Add Zone - adds a zone to the incoming laser content.
Delete Zone - deletes zone routing (if it exists) from incoming laser content
Replace Zone - replaces the routing information.
These four operations are real routing math that allows you to manipulate the laser content with routing information. The question is - WHEN? to do this..
You can do this at the ProTrack, Cue, or Master Level. Also at the Zone Level. When the laser content comes to the projection zone level, it too can change the routing information. All laser content that is routed into the Zone will stay there.
The most attractive place is within a ProTrack. Each ProTrack has its own Presets and special Zone properties to access from PangoScript. The Zone math is an additional method to control ProTracks.
Palette effect
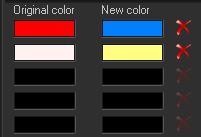
The Palette effect is a simple replacement table of one color to the other. All that is required is for you to define a pair of colors - Original and New.
The effect works with exact colors. No “delta”, no animation. There is a similar Key Effect, “Replace Color”, if you need more control.
Effect Properties
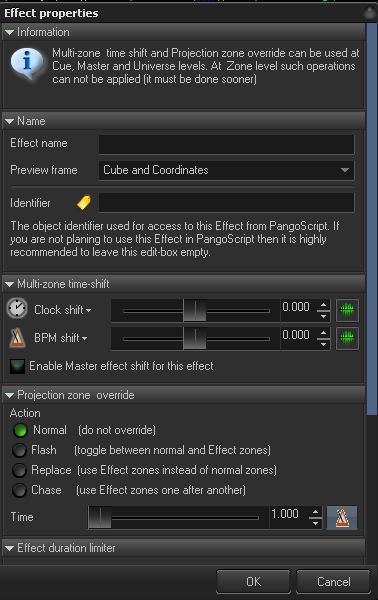
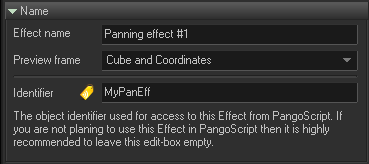
Effect name - name of the effect as it will appear within the user interface; for example, in the FX Grid.
Preview frame - for effect visualization, BEYOND should use a Preview frame. BEYOND offers four standard Preview frames. One of them came from QuickShow, this is default option, three other frames are from LivePRO, and are used for Effects, Key Effects and Color Cycle.
Identifier - identifier is used for access to the Effect as a 1st level (public) object. This is helpful when working with external access by OSC, using in the BEYOND Universe, or for PangoScripting. When an Effect has an identifier, it can be addressed from any place.
Multi Zone time shift
- Laser Content should be routed to multiple zones
- Delta (time shift) between zones
- Action - Effect
EYOND takes the incoming frame, calculates the effect for the 1st zone, saves the result, takes the original frame, applies the effect with time shift, saves for the second zone, takes the original frame, calculates the effect with double the shift value, saves to third zone and so on… The important consequence - at the time the laser content is incoming, we have one frame that is routed to multiple zones, and once outputted - multiple frames being routed to one (corresponding) zone.
Please note, Multi zone time shift can only be applied once, and instead of one frame we have many frames at the output point as it is too late to do at the Projection Zone level.
Clock Shift and BPM shift define a “delta” - time shift between zones. Note that the parameters can be controlled by Input options.
Time shift is a property of a whole Effect. BEYOND will calculate the effects before it applies them to the laser content.
Enable Master effect shift for this effect - Master tab has two sliders specially dedicated to be used with Master value, a value applied to all effects. Such things cannot be applied to all effects. When you enable this option, you allow effects to be used with a time shift.
Projection Zone override
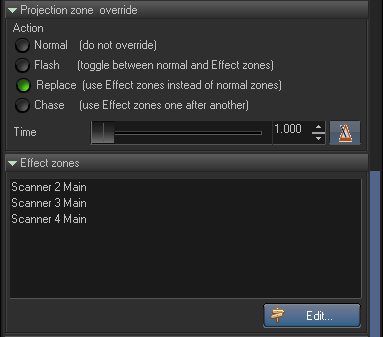
This option in the Effect properties is calculated before the creation of a Zone Chase and Zone Routing effect. This can be considered a duplicated option but, this option works great with Multi zone time shift effects.
Actions are:
Normal - leaves routing information as it is
Flash - toggles between the original routing information of the laser content and the routing defined in the effect
Replace - assigns the routing defined in effect instead of original defined routing.
Chase - uses Projection Zone list as the chase definition. This is a simple chase, by one element only.
Time - duration of the step for Flash and Chase modes
Effect Zones
Routing information (Projection Zone names) for Flash, Replace and Chase.
Effect duration limiter
Options Limit clock duration and Limit beam duration suspend the time after the specified limit. The incoming time will pass as it did before the limit, but after the limit the higher values will be limited to the value defined.
FX Cell Property
The FX Cell property is an option added specifically for the FX Grid. This is not a full-blown system of clicks, limiter, and other tricks as it is made for Cues, but this is to help organize the FX grid better.
- Default - use current click mode defined by FX tab toolbar buttons
- One - always on “one” effect mode. Such effects work “all alone” in the FX line
- Multi - always in “multi” effect mode. Such effects are designed to be combined
- Drop - always in “drop” mode.
Effect Item properties
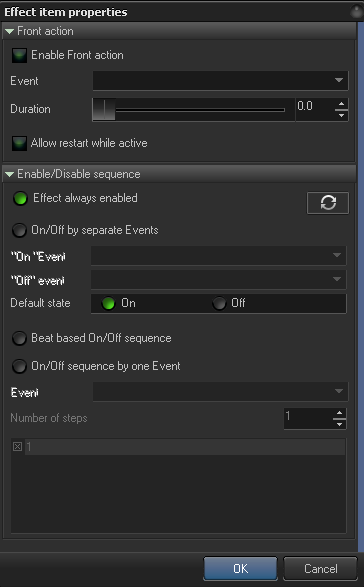
The Effect Item properties are a setting for one single effect item (operation). Each item has its own settings. This effect is designed to react on Events such as audio changes and for simple on/off chases.
Front Action
his is an exceptional option! As a rule, an effect uses the time of the cue player, of live control, or of a timeline… but never its own time. Time comes as argument and the effect acts as a function. When you enable this option, the effect will use ITS OWN TIME, and ignore everything else.
It is designed to react to audio peaks. For example, if you want to create an effect like “jump up” as a reaction to a bass drum. To make this happen, we need a few things set up for us:
Event - this effect should react within an Event. Here you define the name of the event. It can be a standard event name or a custom name that can be used in PangoScript by means of PulseEvent.
Effect - the effect you want to use.
Duration - length of reaction. The effect will react and then stop based on this duration value.
Enable front action - mark this to enable this feature.
Allow restart while active - defines what to do if the event repeats, while this effect is active. If you choose restart, then it will interrupt the execution and start from beginning.
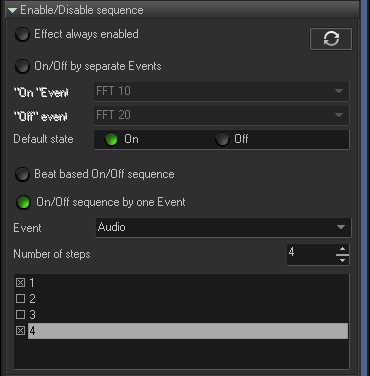
Enabled/Disable sequence
This group of options allows you to enable or disable an effect based on a few options.
Effect always enabled - this is the default state; the effect will always work.
On/Off by separate Events - the first Event enables the effect item, the second Event disables it. For example, a bass drum to enable the effect, and a snare drum to disable the effect. The Effect can work in between the two events. Actually, the caption is not 100% correct. You can use the same Event for On and Off. It will also work correctly.
“On” Event - the Event name that will enable the effect item.
“Off” Event - the Event name that will disable the effect item.
Default state - the initial state of the effect item - enabled or disabled.
Beat based On/Off sequence -this is a Metronome (beat) based sequence, like a chase. This option allow a chase type effect. For example, the first Effect item will be active at the first step, and second effect item will be active on second step. Such interaction allows the ability to organize more complex effects where some items will work, the other items will be disabled.
On/Off sequence by Event - A chase driven by the Event. Each Event increases the step index by one.
Number of steps - number of steps in the sequence.
Sequence checkbox list - a list of steps, a checked state means On (enabled).

