
Tools
Support
Pangolin Family of websites
Pangolin Laser Systems, Inc.
Kvant Lasers
Unity Lasers
ScannerMAX
Lasorb
Tools
Support
Pangolin Family of websites
Pangolin Laser Systems, Inc.
Kvant Lasers
Unity Lasers
ScannerMAX
Lasorb
The main functions within BEYOND are controlled by the Toolbar, which is located at the top of the Main Control Window.

When the window width (screen resolution) is not sufficient, BEYOND will hide less important buttons.
The Cue triggering mode controls what happens when you click on a cue with the mouse (touch screen or external command).

In Select mode, cues are not activated when you click on them. Cues are only selected or highlighted. This is handy when you want to drag and drop cues within the workspace, or when you want to change the Properties of a cue, without activating it.
In Toggle mode (as indicated above with the green highlight), cues will “toggle” their activation mode each time you click on the cue. For example, if you click on a cue once, it will start playing. If you click on the cue again, it will stop playing. Toggle is the default cue triggering mode.
In Restart mode, cues will be restarted each time you click on them. For example, if you have an animation which counts down to zero, the count-down will restart each time you click on the cue.
In Flash mode, cues will only remain active for the period of time you are clicking on them (or holding your finger pressed on the touch screen). For example, when you click the left mouse button on the cue, the cue will begin playing and will remain playing until you release the left mouse button.
Flash-Solo mode is similar to Flash mode, but it will temporary disable other currently playing cues, and leave only the cue started in Flash-Solo mode running.
The Transition button controls what happens when you trigger a new cue and there is already a cue playing.

When Transition mode is activated, morphing (default transition) will be performed between the currently-displayed output and the next cue you choose to display.
You can change the type of transition that is performed by right-clicking on the Transition button. You can also control the transition by showing the Dynamics tab in the View menu.
BEYOND allows you to play either one cue at a time, or multiple cues simultaneously, depending on whether the One cue or Multi cue button is pressed.
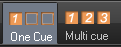
You can choose the behaviour of both the One Cue button, and the Multi cue button, by right-clicking on each button. These can also be controlled by showing the Dynamics tab in the View menu.
BEYOND is a beat-oriented program. The beat counter is always running; you can see the beats per minute (BPM) along with a metronome icon to indicate the BPM value.
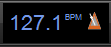
You can set the beat by repeatedly clicking on the “BPM” button, or by repeatedly tapping the SPACE BAR on the computer keyboard. You must click the BPM label or press the SPACE BAR repeatedly to the beat of the music. When you do this, the average BPM of the clicks or key presses will be calculated and this will be used to synchronize the beat system timer.
Note that you can press the BACKSPACE key on the computer keyboard to “re-synchronize” the timer beat system to the beat of the music, in case the music timing becomes slightly ahead or behind the timer.
You can also enter a specific BPM, and control other aspects of the current BPM by right-clicking on the Beat icon.
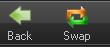
Back stops the currently active cue and starts the previously active cue.
Swap toggles between the current cue and the previously active cue.

QuickShow includes a new and ground breaking feature called Virtual Laser Jockey, which can be used to make a completely automated laser show synchronized to the BPM or incoming audio.

The DMX IN button is visible only when the DMX-IN control of BEYOND is enabled (see DMX Settings dialog). This Button was added for safety reasons. It allows quick enabling and disabling of the DMX control of BEYOND. DMX input control is enabled when the button is pressed.
The Blackout and Pause buttons control the overall playback of BEYOND.
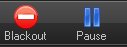
The Blackout button causes all output to immediately stop. This will also reset certain program functions, including the cue triggering mode. Blackout can also be activated by pressing the ESC key on the computer keyboard.
The Pause button will pause all currently-playing cues. Pause can also be activated by pressing the Pause key on the computer keyboard.
The Enable Laser Output button is found at the far right of the toolbar.
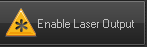
In order to enable output from the laser controllers, the Enable Laser Output button must be pressed.
 BEYOND has an internal beat-manager that takes care of the beat synchronization system. The panel below sets the mode for the beat manager. From PangoScript, the main settings are controllable by means of a Master object. The Beat value can be controlled manually or from a MIDI Clock. Please note, a MIDI Clock and MIDI Time code are different things.
Right click on the BPM panel to show a popup with these settings.
The edit-box and slider allows you to set the BPM. Buttons at the right offer a few frequently used beat values.
Use internal BPM system only - disables using MIDI Clock messages
Enable MIDI input to set BPM - allows use of MIDI Clock messages when they are received.
Quantize Clicks - a “helper” tool to click in time. If you click a but sooner the BEYOND stores the click and will do it later just in time. If you click a bit later then BEYOND adjusts the start time of cue for compensation of the delay.
Hard Beat Sync - in Hard Beat Sync mode, the cue player uses time of the centralized Beat manager. Otherwise it uses the local beat time of the Player. Hard sync mode keep all cues synchronized because they use one beat-time source. But it also has a specific command - cue start not from zero.
0 at resync - sets beat number to zero (beginning) during the Resync command.
Loop mode - by default, the beat index goes up without a limit. Loop mode allows it to count like a musician - 1,2,3,4, 1,2,3,4, 1,2,3,4 and so on. It means that the beat number will be looped in the range, and never go out of range. The Edit-box below the button sets the max value; for modern music it can be 4, 8, or 16.
Link is a technology developed by Ableton that keeps Link-enabled applications in time over a local network. Link synchronizes musical beat, tempo, and phase across multiple applications running on one or more devices.
Link acts as server and as client. This means that every link capable device on the same network will be able to send and receive the beat.
By enabling the Link button, BEYOND will follow the incoming beat. If the beat has changed on another device, BEYOND will receive the updated beat and change it counter.
If the Beat is changed in BEYOND, all other link capable devices will receive this update and will follow BEYOND its beat counter.