
Tools
Support
Pangolin Family of websites
Pangolin Laser Systems, Inc.
Kvant Lasers
Unity Lasers
ScannerMAX
Lasorb
Tools
Support
Pangolin Family of websites
Pangolin Laser Systems, Inc.
Kvant Lasers
Unity Lasers
ScannerMAX
Lasorb
Pangolin’s BEYOND Software is compatible with a wide variety of MIDI devices. While we are distributors for MIDI devices manufactured by Numark, Akai and Livid (such as the APC40 and OHM), BEYOND can also work with other third party MIDI devices in addition to these. Information on how the MIDI Settings within BEYOND are discussed in detail below.
Within the MIDI settings menu shown below, you can select and configure MIDI devices for input and output, and for control to and from BEYOND. You can also select the MIDI input and output devices you want to use from the drop downs lists, and you can configure each device using the “Configure” button.
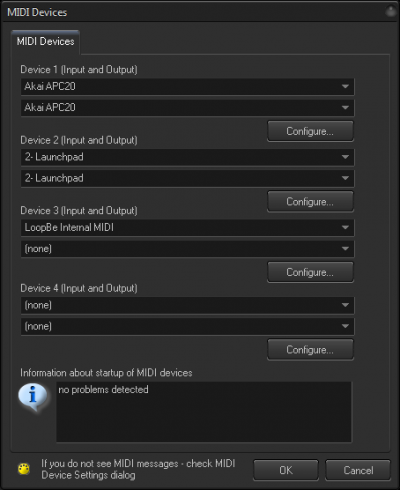
As soon as your MIDI device is connected it is a good idea to test it by moving a slider or pressing a button on the controller. If it is connected correctly, you should see a MIDI message in the bottom of dialog (as shown below) showing that the MIDI note has been received by BEYOND.

eminder: This MIDI Settings menu will enumerate MIDI devices when you open it. Ensure that your device is connected before opening the MIDI Settings menu.
Recommendation: Keep your MIDI device connected during your whole BEYOND session.
Once In/Out devices are selected, click on the Configure button.
In the Device Settings menu, you can load MIDI profiles that have been created for a device, customize an existing MIDI profile, or create your own device profile. There are several options on each Tab of the MIDI settings menus (Main, Options, MIDI “Metronome”, Enabled Channels, and Scripting).
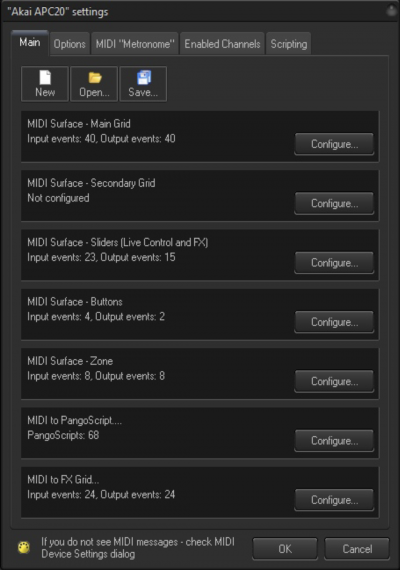
The Main tab (shown below) has 3 standard File menu icons, and these include: “New”, to clear out all current MIDI device profile settings, “Open”, to open a saved MIDI profile settings file, and “Save”, to save out a MIDI profile settings file, with the settings currently set for that MIDI device.
There are 7 configurable MIDI settings categories:
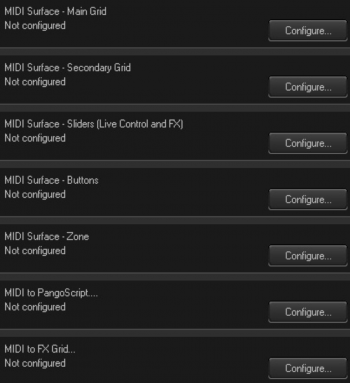 Main Grid - Settings for the main grid, located in the central area.
Secondary Grid - Settings for the grid located in the QuickTools area.
Sliders - Settings for the sliders in Live Control, Time Control and FX Tabs.
Buttons - Settings for the main buttons, such as buttons on the main toolbar or Live Control tab.
Zone - Includes two tables, one for Projection Zone Selection, and one for Projection Zone Mute.
MIDI to PangoScript - Includes multiple tables, where you can assign PangoScript commands to MIDI messages.
FX Grid - Contains 6 tables, one for each FX line.
Each category settings can set up by clicking the “Configure” button next to that category.
In all of the tables, you will see the column’s Layer. Many clients ask us “what does this mean” or “why does this appear in recent builds of BEYOND”?
MIDI controllers have many buttons, sliders, knobs, etc… But even with all of these, there are still not enough to cover all of the functions that BEYOND has to offer. As such, we needed to develop a way to assign more than one function to a button, slider, or knob.
To do this, we introduced the concept of layers. For example, the first layer can work with Live Control, the second with Channels, third with Effects, and so on.
For mapped BEYOND functions, you can specify to what layer it will belong to. To do this, you can link the MIDI message and function, but please note, that the link works only for the specified layer.
The important thing to remember, is that functions may exists in multiple layers, and you need to remember which functions you have layered.
Main and Secondary Grid Settings, and the FX Grid
BEYOND uses the same code for multiple grids. The main purpose of the setting, is to define a relation between MIDI messages and the cell in the Cue or FX grid. Here we are talking about the Main grid, but the same logic and windows/dialogs, work for FX too.
To configure a MIDI controller to be able to activate the main cue grid of a BEYOND workspace, you will use the Configuration button for the MIDI Surface – Main Grid.
Hint: Why do we have two independent grids? The reason is because each Grid has it’s own click mode (flash, toggle). You can use the main grid in Toggle mode, and the secondary grid in Flash mode. For the main grid you can use an APC40, and for the secondary grid, you can use a MIDI controller like the Livid OHM.
Double click on a cell to manually define what incoming MIDI notes will activate that cell. There are also two tabs available from this configuration menu - Grid Input (for MIDI input messages) and Grid Output (used to communicate feedback about the cue states).
There is a Menu button and three Learn buttons to the right of the Grid Input configuration interface. These and the Main Grid are shown on the following page.
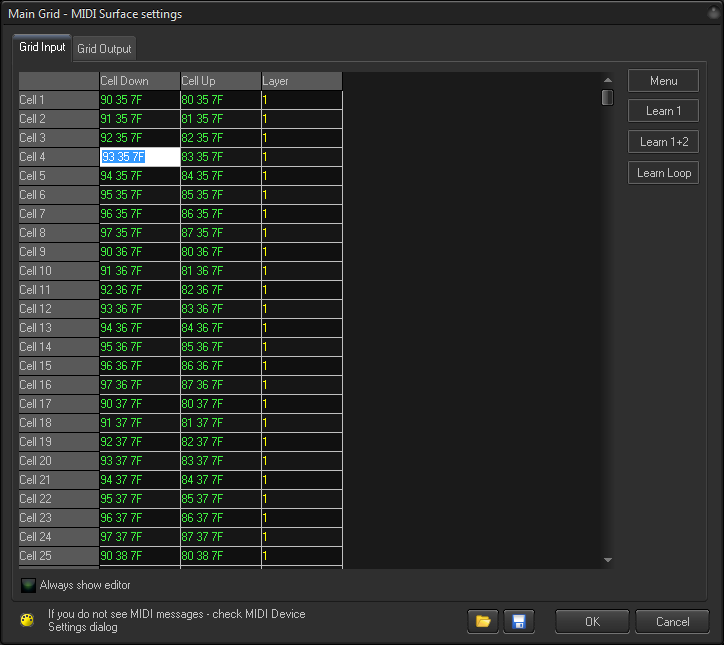
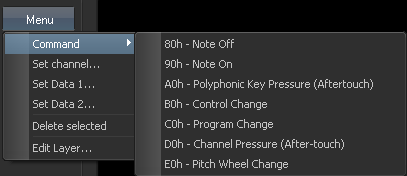
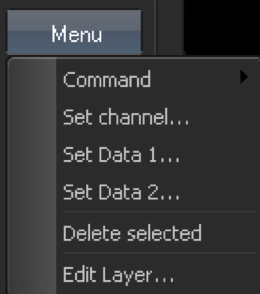
Clicking on the Menu button on the right of the Grid Input settings will open a drop down menu that includes the Command menu (from which you can manually set custom command notes), Set Channel and Data Values, Delete the values in the selected Cell, and Edit the Layer for that Grid Cell. If you right click on a Table Cell, the Menu options will appear for the selected Cell.
Clicking the Learn buttons will allow you to quickly set or link a MIDI button/note to a cue. Learn 1 will set one MIDI note action.
Typically, a MIDI button will generate two messages - A “press” button message and a “release” button message. BEYOND will accept both messages for each cell in the Grid (Cell down, and Cell up messages). Learn 1+2 will set two MIDI note actions (for example the down press of a MIDI device button and the release note of that MIDI device button being released).
Pressing the Learn Loop button will allow you to go through the whole grid of MIDI device button/cells to set each one to a workspace page cue by pressing the MIDI device buttons one by one. Notice that the Cue Grid will highlight the cue corresponding to the Cell position being learned or selected.
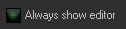
At the bottom of the Main Grid Surface Configuration menu, there is a check box to “Always Show in Editor” which will cause each cell in the grid to open in edit mode when you click on it. This will just highlight the cell by default and you will have to double click on the cell to activate edit mode.
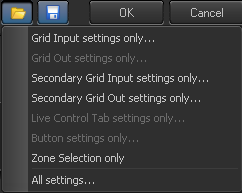
There are also two standard “Open” and “Save” buttons. Each of these have a drop down that allows you to open or save a part of the BEYOND MIDI Surface file. As a rule, you do not need to do this. But, it may be handy if you need to take a part of one MIDI profile and use it in another. In this case, you can save a part of that profile to the file, and load it in the other area it will be used.

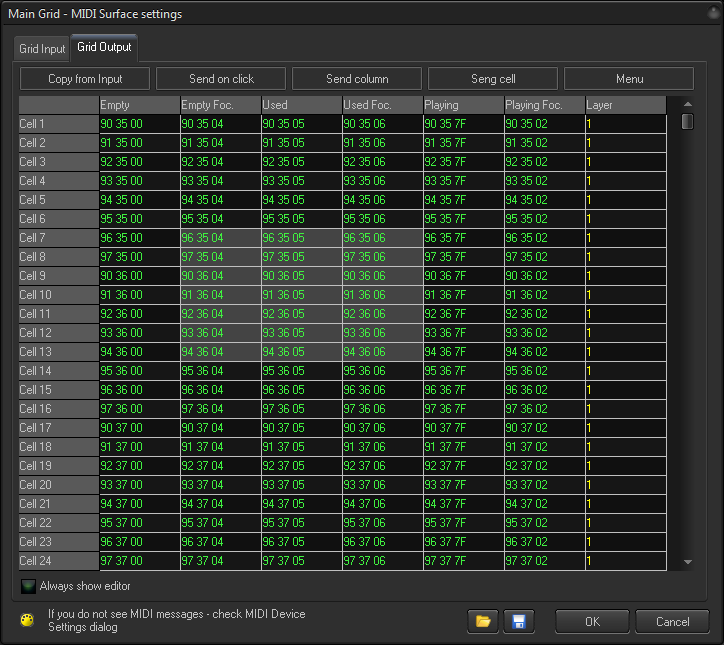
In the previous Grid Input tab, cell reactions to incoming MIDI messages were defined. A MIDI message will be transformed into an internal BEYOND command, just as BEYOND does for incoming mouse or keyboard commands. In a similar fashion, the Grid Output tab is used to link Cells to MIDI output messages, to provide feedback about the cell states. As discussed above, we are sending a message back to the MIDI device. This message will represent the status of the cue (cell); and the grid will define the states for empty, used, focused and playing states.
Hint: You can select multiple cells by using the SHIFT key when selecting Cells. After that, use the context menu, and the command will be applied to all selected cells.
As in the Grid Input settings, there is also a Menu button that functions the same as in the Input settings.
Pay attention to the “Copy from Input” button. Usually a MIDI feedback message is a repeat of the input message. The 1st and 2nd bytes are usually the same, and only the last byte will represent the cell’s “state”. “Copying from Input” allows you to copy the first and second bytes of a message from the Input Grid table to the Output table. If this option is used, you will need to work only on the last (3rd) byte of the feedback message.

Send on click - When this option is enabled, BEYOND sends a MIDI message for output each time as you focus (i.e. click on) a cell. This helps when editing the table. By default, BEYOND does not send MIDI messages automatically.
Send column - This sends all MIDI messages specified in the current column to “MIDI OUT”. It helps you to see how “feedback” looks in the MIDI device. It also helps you detect misprints in the table.
Additionally, under the Grid Output cell table, there is a check box to “Always Show Editor”… As in the Grid Input tab, this will cause each cell in the grid to open in edit mode when you click on it, and it will highlight the cell by default and you will have to double click on the cell to activate edit mode.

There are also two standard “Open” and “Save” buttons. Each of these have a drop down that will allow you to open or save BEYOND MIDI Surface files. As a rule, you do not need to use these menu commands. Instead BEYOND can load and save a whole MIDI mapping, with all settings. BEYOND saves all changes automatically in the default system files.
The next MIDI Surface Configuration settings are for Sliders, for Live Control and FX manipulation. You can see the menu for this below.
To the right of the Live Control configuration interface, there is a Menu button which shows a drop down menu with 4 options. The two delete options are to be used when a specific Live Control cell is highlighted. The Edit Layer option will allow you to change the Surface Layer of the specific Live Control cell you have highlighted. If you right click on a Table Cell, the Menu options will appear for that selected Cell.
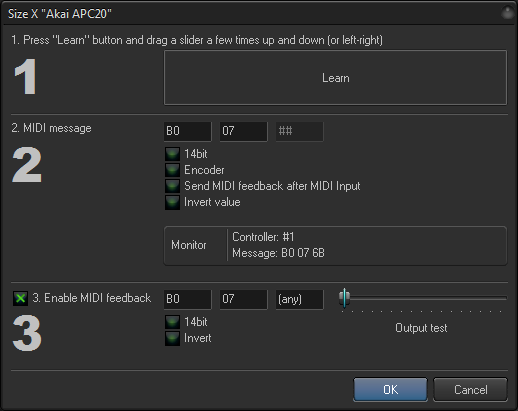
The Edit option will open a dialog box that will allow you to program a specific Live Control cell to react to a specific MIDI device slider or knob. You activate this while pressing the “Learn” button, within the dialog box.
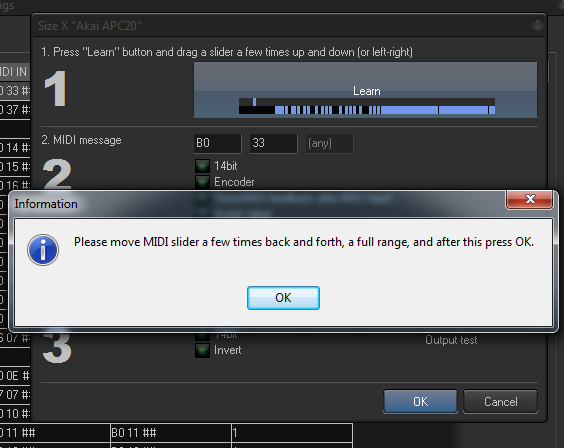
During learning, please move the MIDI slider forward and backward a few times. After that, click the OK button. If BEYOND detects the settings incorrectly, then please adjust the settings manually yourself.
14bit - As a rule, controllers send 7 bit data, and PitchBand messages use 14bit.
Encoder - As a rule, sliders send values from 0 to 127. The knobs (encoders) may use other logic. For example, when you rotate clockwise, you will come to the value 0, and when rotation is counterclockwise, the value will be 127. There are only two messages, instead of a full range of values in between. For encoders, BEYOND uses incremental changes, instead of direct use of the incoming value.
Send MIDI feedback - When enabled, this option is for sliders and knobs that have a visual indication of position (such as the LED lights on the ACP40). When disabled, this can be used for motorized sliders. If you enable this option for MIDI controllers with motorized sliders, you will feel that slider resist to your motion.
Invert value - May be required for knobs.
Enable MIDI Feedback - This option is for motorized sliders or knobs with visual indications, and when enabled, the slider or knob will allow you to test the feedback.
Your MIDI device buttons will be the next MIDI Surface settings you can configure. These settings are usually for the buttons that are NOT the Cue selection “Cells” like the 40 Cue Grid buttons on the APC40. Here you will see all buttons from the main toolbar of BEYOND and also a few other important buttons to take note of.
The table for buttons is common for Input and Output. What may look unusual, is that there are 3 options for MIDI IN messages that will control the button’s state. For example, the “Enable Laser Output” button can be used to enable, disable, or toggle the state of that button. So in this sense, you get increased functionality from your surface buttons when using BEYOND. However, please note, that it is not necessary to define all 3 messages; this decision is up to you as you can define only one message if it fits your show scenario better.
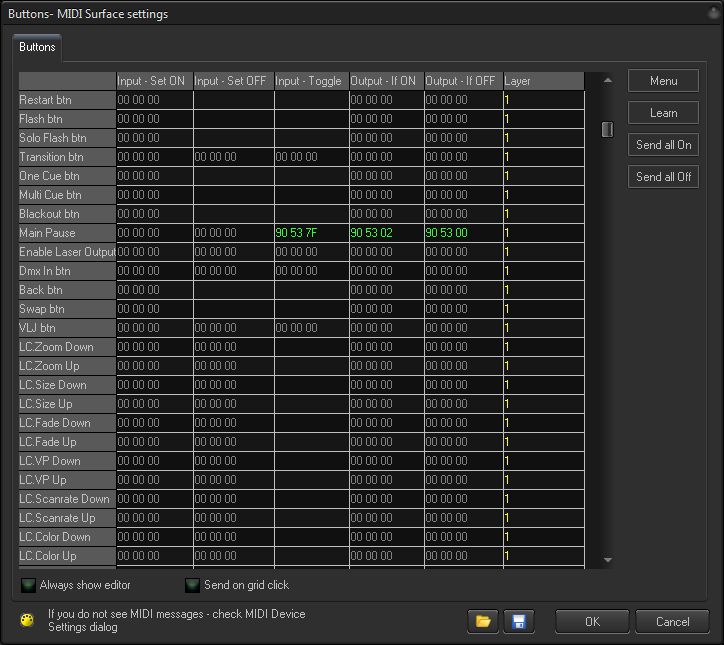
As with the Main and Secondary Input/Output Grids, you can double click on a Cell to edit it manually or use the Menu option on the right side of the interface. The Menu button has the same options as the Main and Secondary Input/Output Grids, and each option is also set up in the same manner.
In addition to the Menu button there is the “Learn Button” which will set one MIDI note to a BEYOND command listed in the Cell you have highlighted.
The Send all On command sends MIDI feedback data, as a whole column “Output – if ON”.
The Send all Off command sends MIDI feedback data, as a whole column “Output – if OFF”
Under the Buttons cell table, there is a check box to “Always Show Editor” which (as in the Grid Input tab) will cause each cell in the grid to open in edit mode when you click on it.
Send on grid click - When this option is enabled, BEYOND sends MIDI messages to output each time as you focus (click on) the cell. This helps when editing the table. By default BEYOND, does not send MIDI messages automatically.
MIDI Surface Zone configuration has two options: one for configuring MIDI notes to select a BEYOND Projection Zone, and one for configuring MIDI notes to Mute a BEYOND Projection Zone.
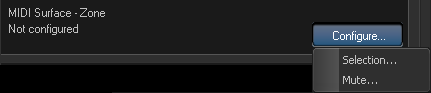
The MIDI Surface Zone Selection configuration grid will show each Projection Zone you have set up in the Projection Zone Settings. As with the MIDI device Buttons configuration, you have three options for MIDI IN messages that will control the button state, and two messages for MIDI IN messages that will control the button state and two messages for Output to communicate feedback of the Zone state.
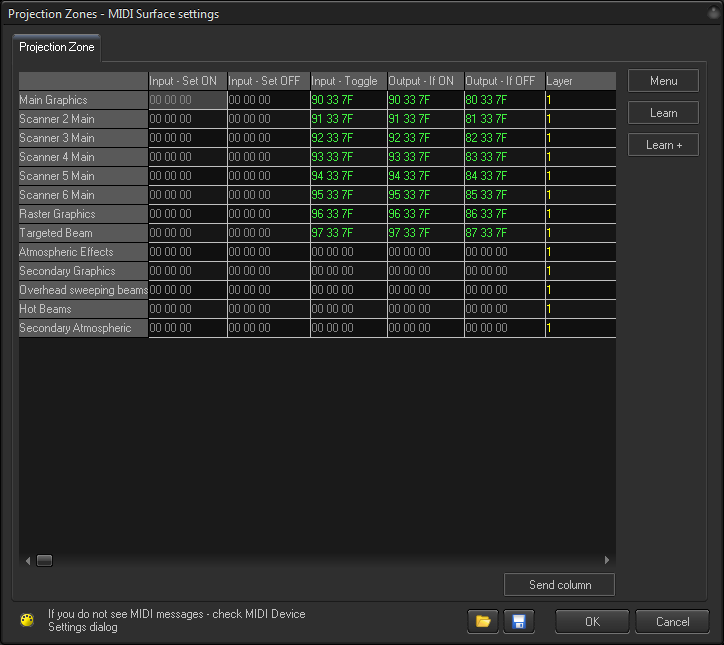
As with the Main and Secondary Input/Output Grids you can double click on a Cell to edit it manually or use the Menu option on the right side of the interface. The Menu button has the same options as the Main and Secondary Input/Output Grids, and each option is set up to be the same, with the exception of the additional “Copy Column to” option. If you right click on a Table Cell, the Menu options will appear for that selected Cell.
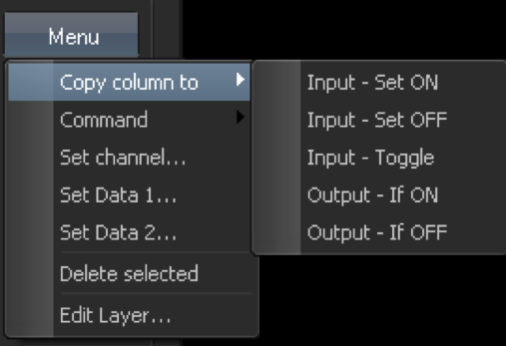
The Copy Column to option will take the information from an already programmed column (a column that already has been programmed with MIDI data) and copy it to another column you designate.
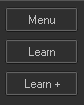
In addition to the Menu button, there is the Learn Button which will set one MIDI message to a BEYOND command listed in the Cell you have highlighted. “Learn +” has a similar action, but after storing the MIDI data, BEYOND selects the next cell below, preparing for the next Learn.
Pay attention that as a rule, buttons on MIDI controller first send MIDI message when you press the button, and the second message comes when you release the button. This may be confusing when you use Learn mode. The first message is correct, but the second (on release) will have another code. The Result is that BEYOND will react on the release of the button, instead of when you’re pressing on it.
The Send column button will send all MIDI messages specified in current column
In the MIDI to PangoScript settings you can configure custom scripts to control almost any aspect of BEYOND and assign them to individual incoming MIDI messages from your MIDI controller device. To configure an incoming MIDI message, just press a button, move a slider, or turn a knob on your MIDI controller device. This action will bring that control’s MIDI message into focus within the MIDI to PangoScript settings.
BEYOND will recognize if a message is from one of 4 categories: Note On (means the button is pressed down), Note Off (means the button is released), Control Change (is for sliders or knobs), and Pitch Bend and will open the corresponding MIDI to PangoScript setting tab, that shows that specific MIDI note.
A diagram showing the MIDI to PangoScript settings is shown on the following page.
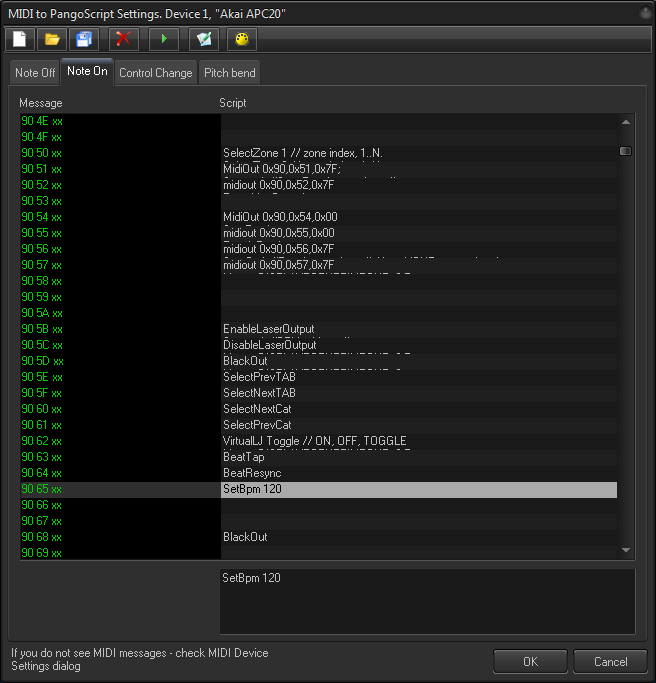
Once you have the MIDI note you want to configure in focus, double click on the grey highlighted line to open the PangoScript editor. This is where you will create your script code to perform the action in BEYOND that you want to correspond with the incoming MIDI note. More information on Scripting can be found in the PangoScript section of the help files.
The specifics that related to MIDI initiated scripts are noted below:
The MIDI to PangoScript settings window has a row of seven commands at the top of the window. Three are standard commands, New, Open, and Save to create a New MIDI Table, Open an existing MIDI table, and to Save a MIDI table you have created.

Additional commands are Delete, to delete an existing PangoScript from a MIDI note, Run, to execute an existing PangoScript from a MIDI note, Edit, to open the PangoScript editor window, and MIDI Monitor to open a window that will display MIDI signals that BEYOND is seeing.
In the MIDI Settings Options Tab, you can configure the operation of the input device you are setting up.
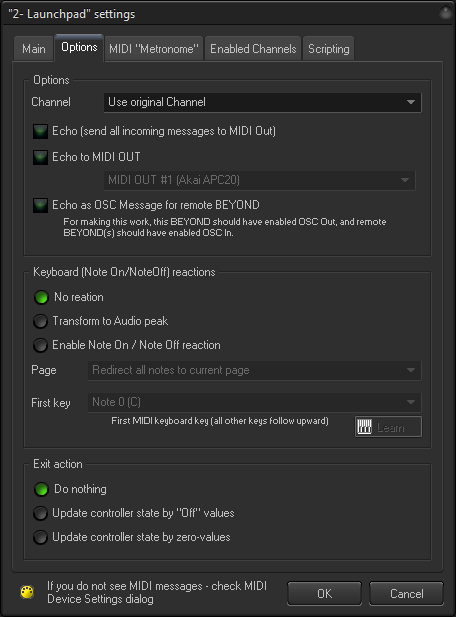
Channel - This is a legacy option that came from LivePRO. This option allows you to modify MIDI Channel-in messages. We recommend that you leave it in it’s default state.
Echo - Sends incoming MIDI messages to MIDI OUT of this pair. The limitation of this option is that SYSEX is not supported.
Echo to - Sends incoming MIDI messages to the specified MIDI OUT. Pay attention that the identification of MIDI OUT is done by the number of the MIDI pair. BEYOND will link to the exact MIDI device name here.
For example… You use our standard APC profile, that requires an IN and OUT device. But, you want to link the APC to one more application. In this case, you can use the virtual MIDI loopback driver, such as LoopBe1, and echo all messages from the APC to LoopBe1, and your second application will read the messages from LoopBe. Sort of like a “Y-cable”.
Echo To OSC - With this tool, BEYOND generates OSC messages. These can be used in OSC capable software, or by other BEYOND’s in your local network.
This section designed for use with MIDI Keyboards that generate Note On, Note Off messages. For most of the MIDI Controllers on the market, this is not really applicable. But, we’ve included documentation for this, just in case.
No Reaction - Means that this option is disabled.
Audio peaks - Takes a Note’s pressure information and writes that into the FFT spectrum buffer. The Note number is used as the frequency number (1:1). The note pressure value is used as the frequency value. See the Audio Tab for more information on this functionality.
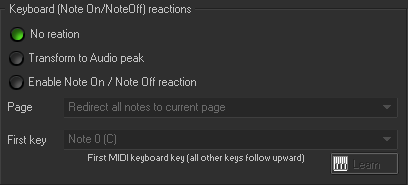
Enable Note - Allows you to start and stop cues. The “First key” sets the key that will be used to trigger the top-left cue in the cue grid. Higher notes on the MIDI keyboard will trigger incrementally higher BEYOND workspace cues.
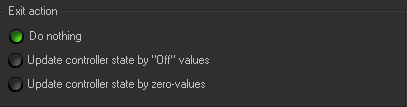
The last configurable input option is the Exit action, which can be set to Update the controller ‘s state to “Off” values or using “Zero-values”.
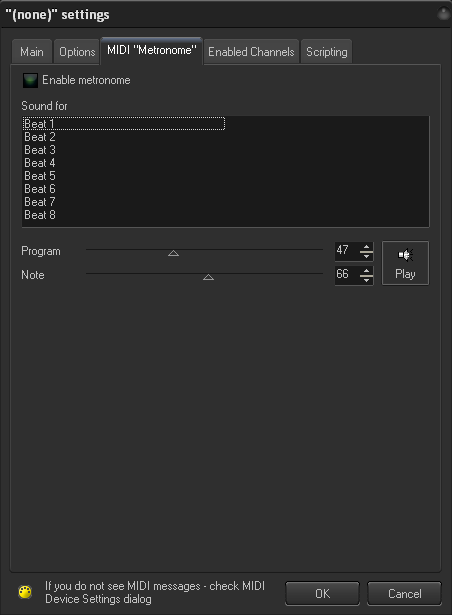
BEYOND can generate MIDI messages, as a metronome. This is not time code in the traditional sense, but it can be used in a similar fashion.
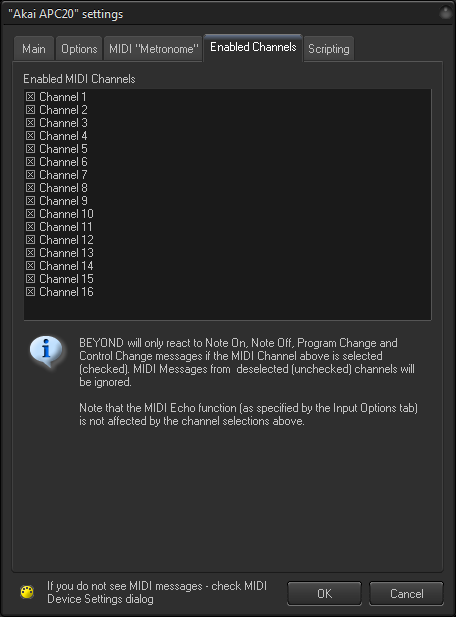
Here you can tell BEYOND which MIDI Channels it can use for incoming MIDI messages. If the channel is not enabled, then the message will be blocked.
Here you can set up PangoScripts that will be ran during MIDI Initialization (when the MIDI device is initialized), MIDI Finalization (when the MIDI device is exiting), and Background (while the MIDI device is being used after it is initialized).
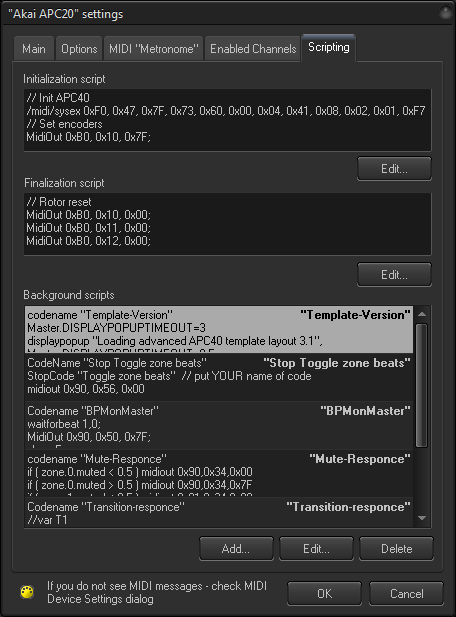
Clicking the “Add or Edit” buttons will open the PangoScript editor to edit the script you are working with or to add a new one. The Delete button will delete the script you are working with.
The MIDI Script of this section has one cool feature worth noting. They use common storage of variables. If you declare variable in one script, it will work in others. This allows all scripts to work together. The initialization script can declare and set variables into their initial state. Other scripts will be able to use this later as well. It helps to simplify interactions between scripts.