
Tools
Support
Pangolin Family of websites
Pangolin Laser Systems, Inc.
Kvant Lasers
Unity Lasers
ScannerMAX
Lasorb
Tools
Support
Pangolin Family of websites
Pangolin Laser Systems, Inc.
Kvant Lasers
Unity Lasers
ScannerMAX
Lasorb
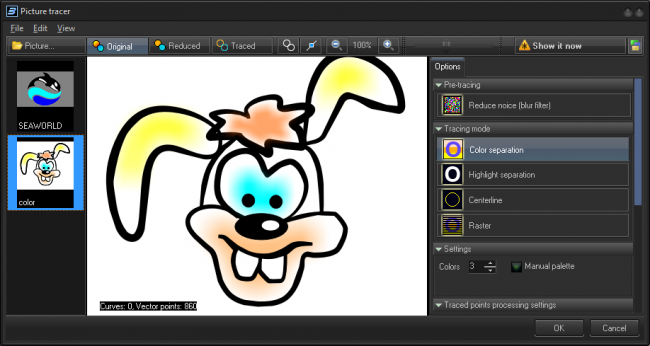
The Picture tracer provides the ability to get an outline or centerline trace from a raster picture. The best results come from simplified graphics. The complex pictures like a photo has many details (like shadows) which can creates problems with creating extra lines and points. The result of tracing a picture is directly dependent on the complexity of the source image. The tracer can trace any picture, but tracing an image that is too complex will create a laser content image that does not display well.
The trace process has a few stages - raster image simplification, tracing contours or centerline, and finally - point filtering that includes simplification and other processing.
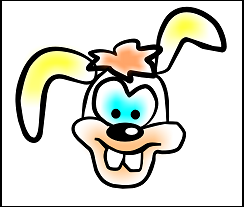
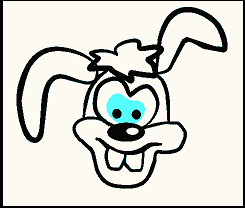
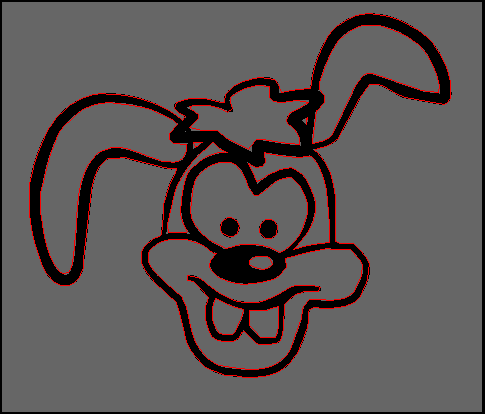
For opening the raster picture click on the Picture button. Buttons Original, Reduced, and Traced define what appears in the central window area - original picture, picture with reduced color number, or the trace results:
 |  |  |
| Tool | Description |
|---|---|
 | Paints traced path with fixed color |
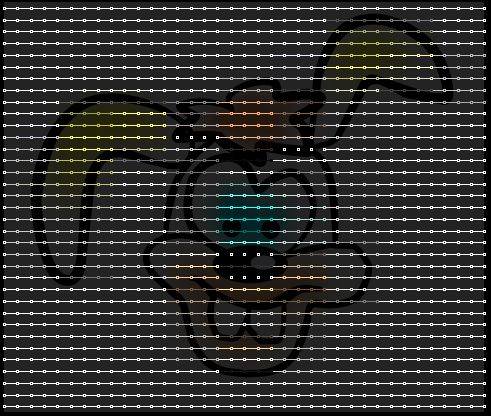
 | Shows traced points |
 | Picture zoom control |
 | Background picture brightness level. The background picture and traced points have the same color, because decreased brightness of the picture allows you easily separate the picture and traced image |

| Tool | Description |
|---|---|
 | Blur filter can reduce noise and improve the traced path |
 | Color Separation is a method of image simplification (separation) based on finding a palette for the traced image and replacing all the original colors of the image to colors of the palette. You can use automatic or manual palette. If you use the automatic palette, BEYOND finds the colors automatically. If you choose manual palette, you will define the colors yourself. |
 | Highlight separation transforms the picture to black and white by means of level sliders. This is a simple method for many business type pictures or clean color pictures. |
 | The Centerline method requires a corresponding input picture. The picture should have exact lines; the tracer will try to make a path by using the center of the lines. Centerline works well with BW input and uses a simple highlight separation method. |
 | The Raster method is not really tracing. BEYOND generates the raster frame and recolors it by bitmap. Raster frame generation allows you to define the number of lines, the number of points in the line, as well as the direction the raster will be drawn. |


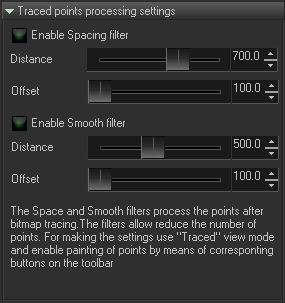
The Spacing and Smooth filters allows you to reduce the number of output points. Minimum values give “soft” effects. Values closer to maximum give the maximum effect. Do not forget to enable “Show point” if you want to see the result of filters on the PC monitor.
BEYOND also allow you to trace a bulk amount of images. Click under the file menu on the “bulk import pictures” option to start batch import images.
Note that you first need to open one image and adjust the settings according to your preference before starting the bulk import. All images will be processed according to the settings set on the first image.

Below additional information from Aaron McDonald, Support Manager.
Text and logos are the most difficult images to re-create in laser as text is the hardest thing to draw with laser scanners.
For a comparison, look in the “Logos” workspace page at some of the logos cues to see how many points are in some of those frames. If you right click on a cue and select edit frame/animation, you will see a value with “Frame points” at the bottom of the frame editor; compare these values between some of the frames and you will see what images flicker and how many points are used in those “flickery” frames (note, some frames like the IBM logo have fewer points in them than most but still flicker due to the complexity of how those frames are drawn. The IBM logo specifically is a bunch of boxes where each box has to be drawn before the next one. It takes a lot of time to draw each box so the frame flickers). Mosts Laserist myself I always prefer to hand trace logos as opposed to use QuickTrace but this is a practiced art form that can take years to get good at (I am still working on it).
QuickShow and BEYOND have a feature called QuickTrace and BEYOND has a Picture Tracer that is slightly more sophisticated than QuickTrace. Both features are quick and dirty tools to get simple graphics traced quickly but are not made to be the only tool for you to use when making graphics or logos. They both basically takes an image and break it down based on 1 of three options, color separation (difference in contrast between colors), highlight separation (makes image black and white and uses the contrast of the altered image), and center line (uses the middle of the object in an image). There are some options for all three… options that you can use to tweak your output but again, they are quick and dirty tools.
If QuickTrace or the Picture Tracer in BEYOND do not get you the results you want you may need to get your hands dirty, or hire an artist, and take the time to create your laser content in the proper way (90% of laser art is hand drawn in some way even if someone eventually produces the content in an art application like 3D Studio Max). I hand trace 90% of all the laser frame content I produce as I want my work to be close to perfect, and quick and dirty is rarely close to perfect. This is where laser frame creation becomes an art form.