
Tools
Support
Pangolin Family of websites
Pangolin Laser Systems, Inc.
Kvant Lasers
Unity Lasers
ScannerMAX
Lasorb
Tools
Support
Pangolin Family of websites
Pangolin Laser Systems, Inc.
Kvant Lasers
Unity Lasers
ScannerMAX
Lasorb
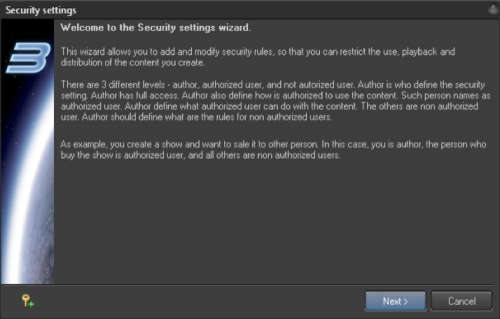
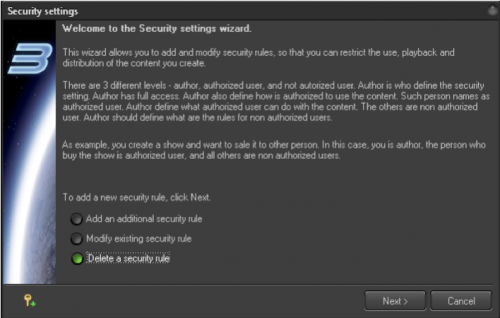
As a successor to LD2000, BEYOND uses a similar logic to this previous-generation software program. LD2000 allowed you to define the security settings for each Frame. BEYOND allows you to define the security settings for each Image (Frames, Shapes, Text, and so on).
The security settings define a restriction, basically a rule stating how the Image should be used. It is possible to use multiple rules. In this case, when any rules define a restriction, they will be applied independently on other rules. The default state is “all allowed”. The security rule introduces a limitation.
Lets take a simple example. You made a show and want your client to be able to use it. At first you need to somehow identify who the client is, and what they want to do with the show. Second, you need to leave some ability to edit the rules, specified by you as a the creator/administrator. Finally, you need to define what allows other people to use the show, in addition to your client.
We have separation on 3 types:
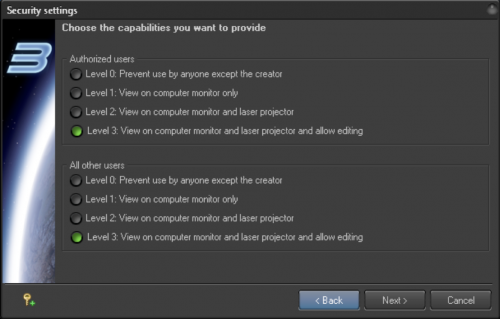
The security rule sets the level that people besides the creator can interact with the show:
| Level 0 | Prevents use by anyone except the creator |
| Level 1 | View on computer monitor only |
| Level 2 | View on computer monitor and laser projector |
| Level 3 | View on computer monitor and laser projector and allow editing |
If you are the creator of the rule, than this rule will not be applied to you, and you will continue to have full access to the show.
BEYOND offers two main methods of identification. The first is the serial number of Pangolin hardware, similar to LD2000. The second is using a password protection feature, which is something new. Using the password is a simple, but it does have one specific detail. We found that the most comfortable way to enter the password is to register it in the system. Meaning – you enter the password once, and it will work for all Images that use it. You will not need to enter it multiple times. Also, it is possible to unregister the password (delete from the list of registered passwords).
Step 1: Informational Page
Step 2: Author Identification (i.e. Creator) Raster Tracer and Background
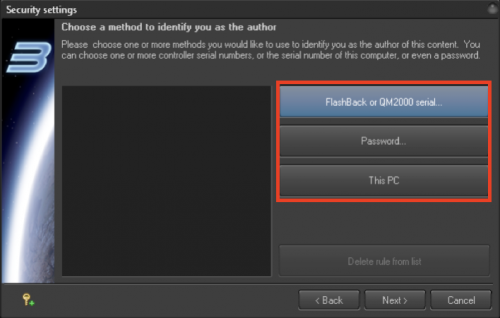
Step 3: Identify Authorized Users
You need to know the serial number of controller that will be used by the authorized user, or decide what password should be used. If you use a password on a previous step, then use another password in any other steps used in the future.
If no one method is defined, then all users are considered “not authorized”. This is also a usable scenario, if you need a simple system – allowing only you to have access to the show, to make changes, etc.
Step 4: Capabilities
Now you need to specify what is allowed for authorized and unauthorized users. If you do not specify a method of identification for authorized users – then the Wizard will show only one set of options.
Step 5: Done
Click OK and proceed.
Choose “Delete” and click next.
At this step you should confirm that you are the Author/creator. Your controller must be connected or password registered in the system. If you need to register a password – click on the icon with the Key and Plus, at bottom of the dialog box. Once the rule is deleted, then instead of a red stop sign you will see a green check mark.
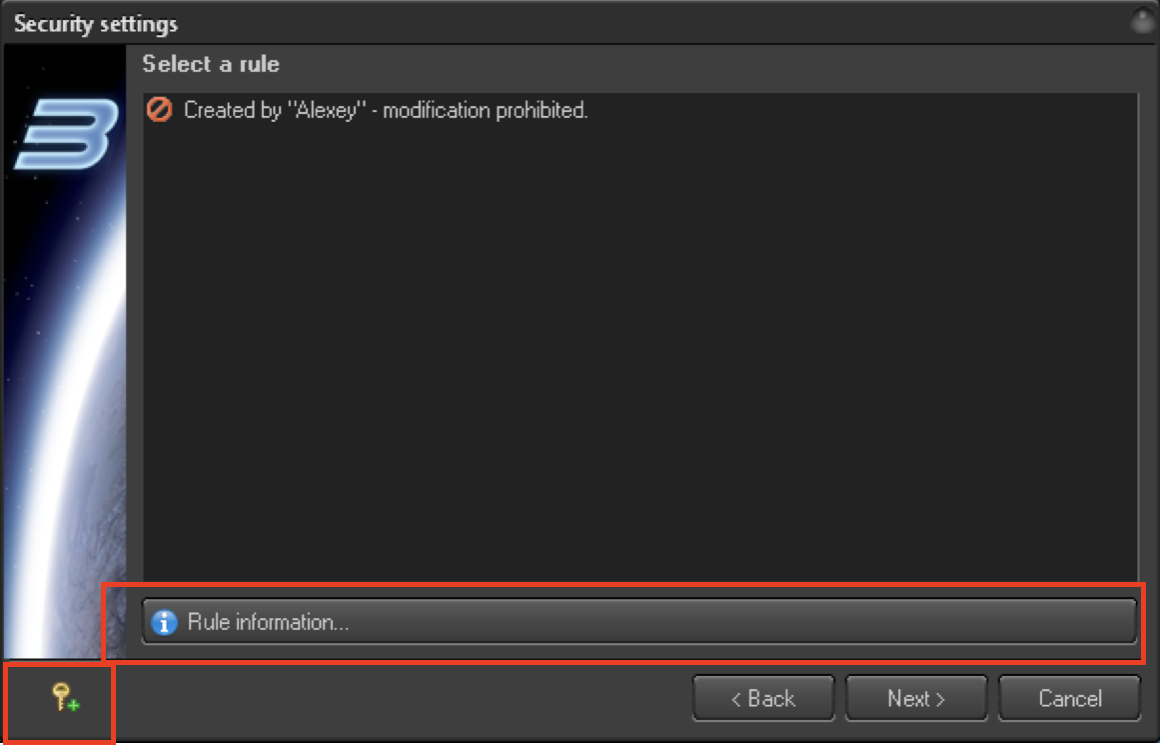
Select “Rule Information” to delete (click on it) and then Next. After that, the rule will be deleted, and you will see a confirmation dialog.
The Image with security settings has a Lock icon. If the security settings do not allow you to preview the Image, then instead of it you will see this Lock icon.

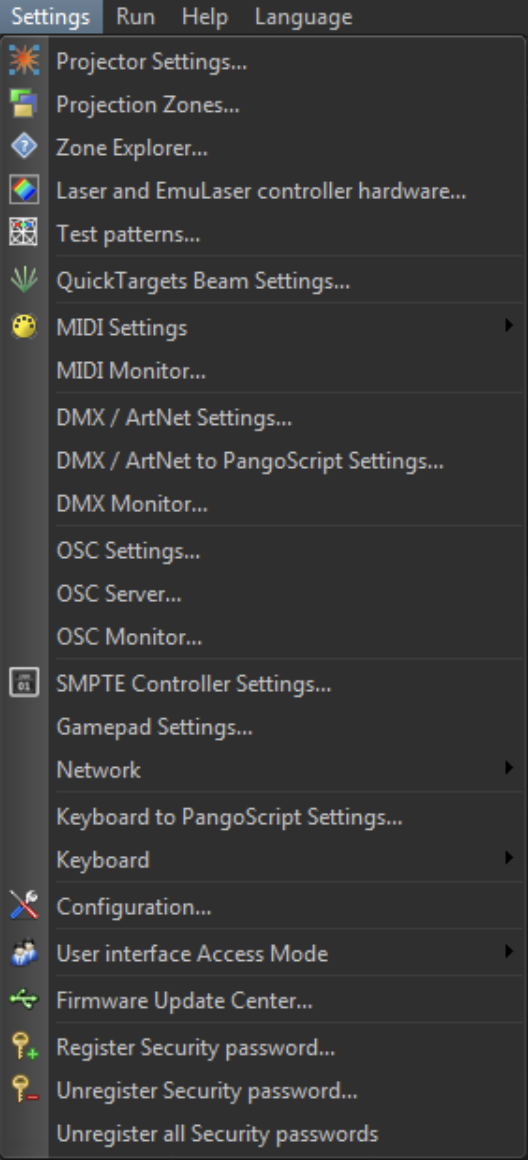
or password registration click on the Register Security Password menu item. It will unlock all cues that use it.
Unregister Security Password removes the password from the list, so you will need to enter it.
Unregister all Security passwords clears the list of passwords. It is useful if you need to go away and quickly remove all registered passwords at once. Of course it does not modify the Image settings.
BEYOND allows you to define a password for Workspace and Show/Timeline files. If the password is defined, then before opening the file, BEYOND will display a dialog-box and ask you to enter the password. If the password is correct, then BEYOND will allow you to load this file. If the password is incorrect, you will not be able to load the show.
The password is only for Load/Open operation. Once the file is loaded, then you can remove or modify the password.
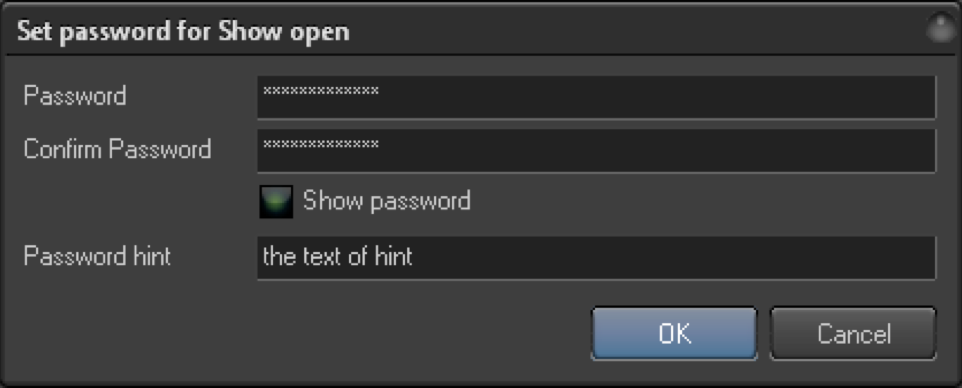
For setting the password, you need to enter it twice, once in Password, and once in the Confirm password box.
We also recommend to use a hint text that will help you remember the password. The hint text is visible in the dialog for entering the password.
In general, idea is similar to using the password in ZIP files. Once the data is extracted, then you can do whatever you want. But you need to know the password in order to open the file.
BEYOND allows you to define a security setting to the Timeline, the same way you do an Image. This setting will not be duplicated in all parts of the Timeline, instead, it will be stored in one place – the Timeline itself. To access to this feature – Tmode, menu File → Show Security
Command “Save secured copy” creates a copy of the timeline and applies security settings to each Image used in the Timeline. This is equal to the manual settings of the security option next to each Image on the timeline. After applying the settings, BEYOND saves the Show to the file. The original show stays as it is, and is not modified.