
Tools
Support
Pangolin Family of websites
Pangolin Laser Systems, Inc.
Kvant Lasers
Unity Lasers
ScannerMAX
Lasorb
Tools
Support
Pangolin Family of websites
Pangolin Laser Systems, Inc.
Kvant Lasers
Unity Lasers
ScannerMAX
Lasorb
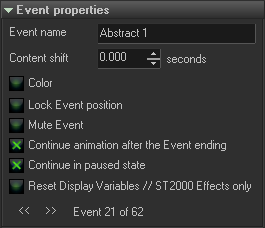
Event properties tab.
Event name - name (text) of the event.
Content shift - the content shift is a time shift. As a rule, the time inside an event starts at zero. Content shift defines a start time for the content located inside the Event.
Color - defines a color for an Event. By default Events use the color of the track.
Lock Event position - disables/changes the Event position (move it) on the timeline.
Continue animation after the Event ending - this is a well known option for ST2000 users. By default, the event stops its action at the end of the adjustable “block” that represents the Event on the Timeline. The option “continue after the end” means that the event continue its action even if the Event has ended.

Continue in paused state - event continues its action after the end, but stops animating. Technically, BEYOND freezes the local Event time and the end state, but continues the calculation of the Event. This option is an additional feature for the Continue animation after the Event ending option.
Reset Display Variables - this option is for imported ST2000 shows only.

Even start and duration - This panel contains controls to set the Event duration in numeric form, without the timeline.
Projection Zone - BEYOND allows you to specify the routing at the Event level. Pay attention that Track settings have a higher priority and will overwrite Event settings. If you need an Event setting to have a higher priority than track, use the “Prevent” rerouting. Before using this option please check the help topic on routing.
Playback settings made for frames/animations. The set of options is relatively big, and includes options from LD2000, QuickShow, and BEYOND.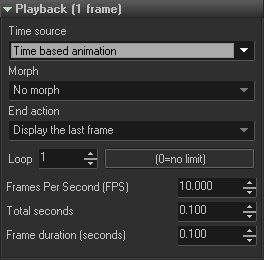
Time source has following variants:
Wave form - BEYOND offers the same set of accelerations that ST2000 includes: Linear, Accelerate, Decelerate, Accelerate/Decelerate, Ping-Pong, Oscillate and Random.
Morph has 3 states:
End Action defines what to do at the end of an animation. For example, a Time based animation may have a limited number of iterations and the animation duration may be different relative to an Event duration. If the Event is shorter than the required time, then the animation will stop sooner. But if the Event duration is longer then there are a few options:
Display nothing (stop) - animation stops generating output.
Display the last frame - after completion, display the last frame until the end of the Event.
Continue - continues the animation. Yes, a bit of a paradox…
Loop Counter - works with all Time sources and defines how many times to repeat the animation.
Frame per second, Total seconds and Frame duration - all 3 parameters define the same thing, but saves us from calculating on paper. Sometimes we need to define a speed, in FPS, sometimes we need to set a total duration. As soon as you set one parameter, BEYOND recalculate the other 2 values automatically.
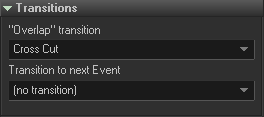 Transitions - work for Image Events. BEYOND has two types of transitions; the first type is when one Event overlaps another. In such a combination, both Events are active (animating) and BEYOND calculates the output between two active Events. The second type is a transition between Events. “Between” means in the empty space between two neighboring Events. The transition happens between the ending state of one event (to the left of the transition) and starting state of event (to the right of the transition). The Events are not animating and are in transition between “static frames”.
Transition between Events is optional, but sometimes a helpful option. Transitions occurring because of an overlap, appear automatically when you overlap one Event over another.
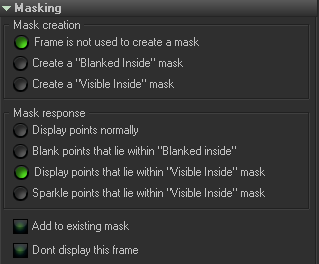 Image masking is a technique where one frame can cover, or mask, another. Masking is part of the Event Properties and is used in a similar fashion to ST2000.
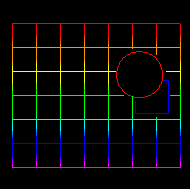
The default is to have no mask applied. Frames are “see-through” or wireframe. In the example below, there are no masks. The red circle and blue square are “see-through”.
In a Blanked Inside mask, anything inside the boundaries of the frame is blanked; anything outside the frame is visible. This is probably the most-used type of mask.
In the example below, both the red circle and the blue square are Blanked Inside. The red circle is in track 1, the blue square is in track 2 (which is why it can be masked by track 1), and the background grid is in track 3.
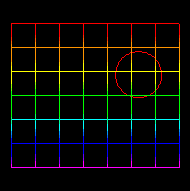
Anything inside the boundaries of the frame is NOT masked; anything outside the frame IS masked. A common use for this is to make a “looking through a telescope” effect.
In the example below, the red circle and the blue square are both Visible Inside. The grid can be seen inside their boundaries.
 |  |  |
In BEYOND, frames can create masks, and other frames can “respond” to those masks.
In the first example below, the background grid is responding to the red circle's masks, by allowing itself to be covered up. This is the simplest situation: one frame creates a mask; another frame responds to the mask:
Note, that to see a mask, you must have at least one frame respond to that mask. Otherwise, you'll just get overlapping or “see-through” frames. In the example below, the red circle is set to create a mask. However, the background grid does not respond (it is set to the option “Display points normally (masks have no effect)”).
 |  |
Frames can both create and respond to masks.
A frame can create a mask, and can simultaneously respond to other masks. In the example to the right, the blue square is creating a mask for the background grid, and the blue square is also responding to the red circle's mask (by allowing itself to be covered by the red circle).
In the example, the red circle in track 1 creates a Blanked Inside mask. Anytime the red circle covers the blue square, the blue square responds by blanking points inside the red circle. The visual result is that the red circle hides the blue square.
| |
Be sure to click on the “Add to existing masks” check box. If you do not, then all masks in higher tracks will have no effect. For example, if the “Add to existing masks” check box was not selected, then the red circle's mask (track 1) would have no effect on the blue square (track 2) or the background grid (track 3).
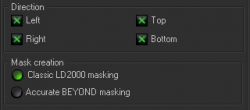
BEYOND extends the ST2000 masking system and adds an extra control for the mask creation. The mask creation is based on raster methods. ST2000 uses left and right mask creation directions. BEYOND offers additional scan directions - Top and Bottom. The mask is more accurate, but it might cause unexpected effects in imported ST2000 shows.
 The “Classic LD2000 masking” method is designed specifically for compatibility with ST2000 shows.
“Accurate BEYOND masking” provides more accurate results.
The “Classic LD2000 masking” method is designed specifically for compatibility with ST2000 shows.
“Accurate BEYOND masking” provides more accurate results.
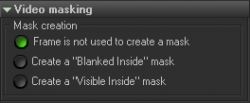
Frame is not used to create a mask - frame is not used in the creation of a mask for video.
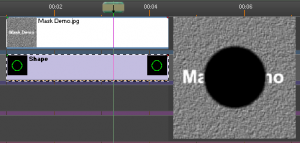
Create a “Blanked Inside” mask - laser frame blanks the video/picture file within the laser frame mask:
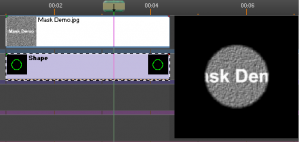
Create a “Visible inside” mask - laser frame leaves the video/picture visible inside of the laser frame area:
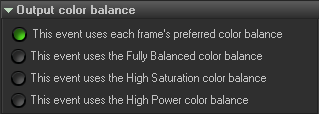 Output color balance - BEYOND, as a successor of LD2000, allows you to create custom color palettes for a laser projector with different color settings, depending on the purpose. For beam shows, it make sense to use maximum power for all colors, for graphic shows is important get the right color balance. The settings itself are defined within the Projector Settings; inside the timeline Event you can specify what setting to use. Just as with LD2000, BEYOND offers 3 settings to choose from or the frames preferred color setting:
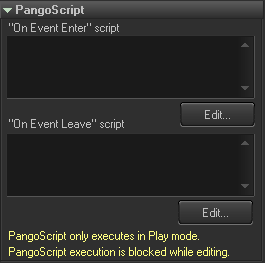
Each Event may have two scripts; On Enter Event and On Leave Event. When the Timeline cursor (current execution time) comes into the Event boundary, BEYOND initiates the “On Enter” script inside the Dynamic script pool. When the cursor goes out of the Event boundary, BEYOND executes the “On Leave” script.
Pay attention that does not work like a script within a main object inside the event..
Beam/DMX - Events use their own settings for playback of DMX and Beam sequences.
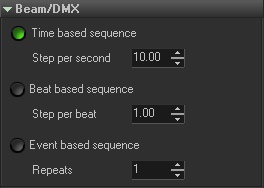 Time based sequence - the playback speed depends on Clock (time) and is measured in steps per second.
Beat based sequence - the playback speed depends on Beats (see Show Properties) and is measured in steps per beat.
Event based sequence - in this mode we define how many times BEYOND will repeat the whole sequence during the Event duration.
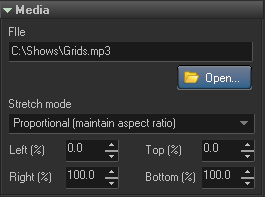 File - the file name of the media file being used. BEYOND can work with audio, video, and picture files. Click on the Open button to choose the file.
Important: BEYOND uses the relative file name only; if the media file is located in same folder as the Show file. It is recommended that, at the end of designing a show, you use the menu, File→ Save Show and copy Media files for BEYOND to save the show into a specified folder and also copy all media files used in the events into this folder. During this process, BEYOND will transform the absolute file path to a relative path.
Stretch mode - specifies how video or picture files are placed inside the Video window.
Left, Top, Right, Bottom - specifies a rectangle for the video/picture inside the Video window.