Tools
Support
Pangolin Family of websites
Pangolin Laser Systems, Inc.
Kvant Lasers
Unity Lasers
ScannerMAX
Lasorb
Tools
Support
Pangolin Family of websites
Pangolin Laser Systems, Inc.
Kvant Lasers
Unity Lasers
ScannerMAX
Lasorb
When you start 3ds Max, the initial screen looks something like this:
Let's create a simple cube and then render it to laser using Lasershow Converter MAX.
The result should look like this:
To view this in laser light, the first thing you need to do is to select Lasershow Converter MAX as the renderer.
Selecting Lasershow Converter MAX as a renderer only needs to be done once for each scene that is created with 3ds Max. If you save a scene in 3ds Max, it remembers the renderer and all other settings.
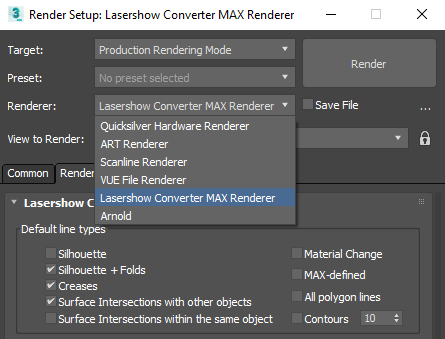
The renderer is selected directly inside the Render Scene dialog. At the top of the window, you will see a drop-down list with the Renderer ,that lets you select different renderers. To select the renderer, simply select Lasershow Converter MAX Renderer as shown below.
Note that the “Render Scene” dialog box has tabs on it. You can assign the renderer at the bottom of the “Common” tab. We also recommend you “unlock” the selection between the Production and Material render, and specify the “Scanline Renderer” as the Material Renderer.
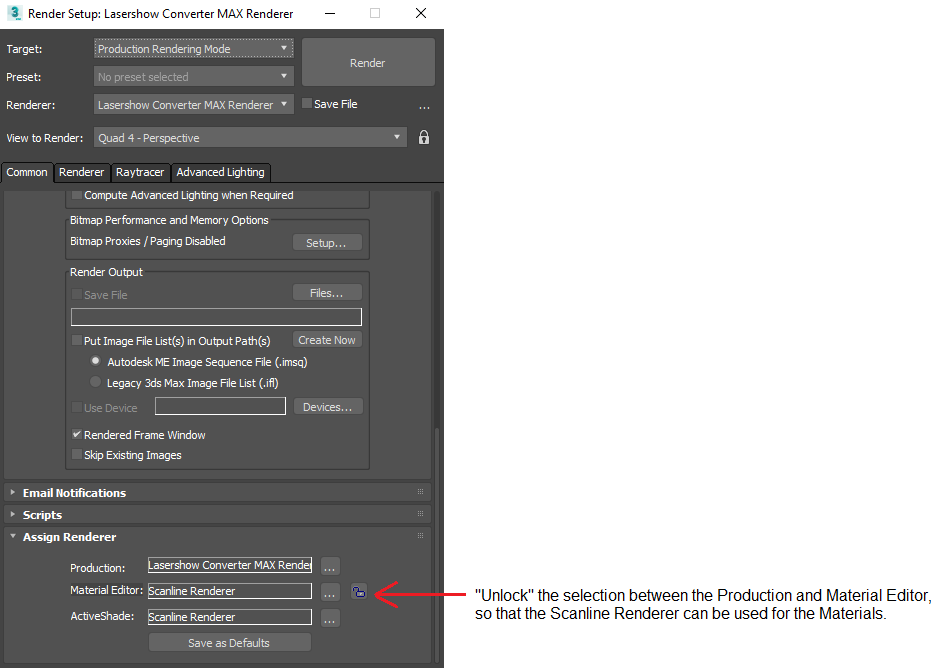
Note: Lasershow Converter MAX can not be used as the ActiveShade renderer.
Now that Lasershow Converter MAX has been selected as the draft renderer, you can begin rendering this scene. To do this, select the Rendering tab on the main screen in 3ds Max and then click the Render Scene button on the toolbar. The Render Scene dialog (pictured below) appears.
In addition, we recommend that in the Output Size section, you enter 320 for width and 320 for height. These numbers control two things:
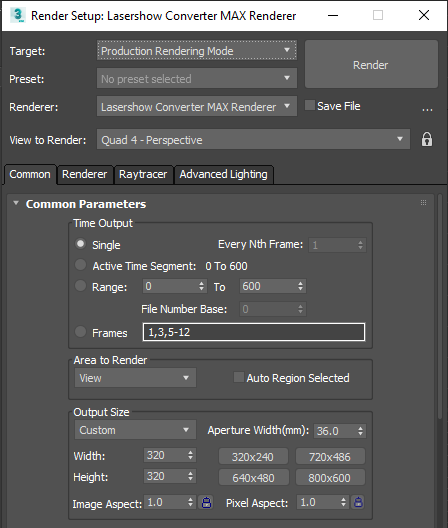
Note: Lasershow Converter MAX does filtering calculations, corner detection calculations and curve detection calculations based on the Output Size settings. The default values for the filter, curve and corner settings are based on a frame window output size of 320-by-320 or 320-by-240. If you choose a different output size (such as 640-by-480), this may require you to change Lasershow Converter MAX's filter, corner and curve settings.
As an additional benefit, when the frame window output size is set to 320-by-320 or 320-by-240, each pixel works out to be around one laser beam diameter. For additional information on this benefit, see the Object filter settings topic.
Now that a few default settings have been set, normal operation can begin. Here is the Lasershow Converter MAX control screen. You will see a number of options that will be discussed in more detail later. For most scenes, these default1) options will be fine.
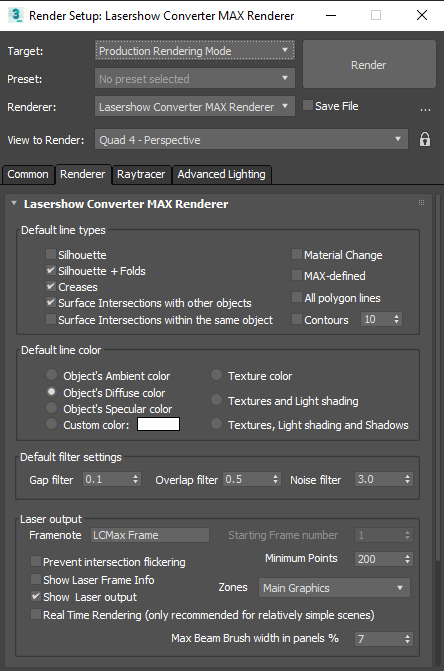
To see the rendered results, simply click the Render button to see the resulting cube outline. The result can be seen below:
In the last topic, we rendered a single frame of the cube. Let's create an animation of the cube rotating. To do this, close the Render Scene dialog and the frame window, then follow these directions:
At this point, you should be able to move the Time Slider back and forth, and see the cube rotating.
To create a laser animation of the rotating cube, click on the Rendering tab in 3ds Max, and then click on the Render Scene button. The familiar Render Scene dialog box is presented.
The last time, only one frame of the cube was rendered. This is because Single was selected in the Time Output section of the Render Scene dialog box. In this case, we want to create the full 100-frame animation, so select Active Time Segment: 0 to 100. Once this has been done, press the Render button. You will see each frame in the 100-frame animation as it is rendered.
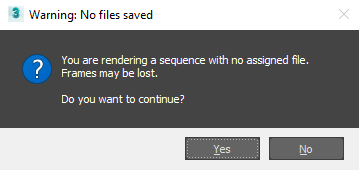
When you click Render there is an annoying dialog box with an incorrect “warning” message. If you don't have a file name selected with the Save File check box checked, AND if you are rendering more than one frame, you get a box saying “Frames may be lost”. This message is wrong – no frames will be lost.
Simply click “Yes” to render the scene anyway.
To see the complete animation in laser light, close the Render Scene dialog and the frame window, then click on the Utilities tab.
(If you have already installed the Lasershow Converter MAX utility plugin, then you will see a Lasershow Converter MAX button on the Utilities tab. Otherwise you should go here to learn how to fully install the plug-in.)
Once you have clicked on the Utilities tab, then click on the Lasershow Converter MAX button. This displays the Lasershow Converter MAX utility control screen, which allows you to view and save the animation, and also to control advanced aspects of Lasershow Converter MAX. (This screen is shown in the lower right hand corner below.)
Just below the preview window in the utility plugin, you will see a check box called Show Laser Output. When this is checked, laser output will be shown on the laser projector in real time.
Now simply click the Play button in 3ds Max. You will see the scene played in the 3ds Max viewports and also in the Lasershow Converter MAX preview window.
Once the frames have been rendered as discussed above, click the button Send to BEYOND, which will send the rendered animation to the cue that is selected in BEYOND.
Here is a summary of how to create laser frames and animations with Lasershow Converter MAX:
1. Select File/Open and select the file name to load into 3ds Max.
2. Select Customize/Preferences, then select the Rendering tab.
3. Assign Lasershow Converter MAX as the draft renderer.
4. Select the Rendering tab on the main 3ds Max screen, and then click Render Scene.
5. Set some default1) settings such as the frame window Output Size and the length of animation you want rendered.
6. Click the Render button to create the animation.
7. Click on the Utilities tab, then click the Lasershow Converter MAX button. (If you do not see Lasershow Converter MAX in the list of utilities, then you must install it by following these instructions.)
8. Press Play to view the resulting animation in laser light, and Send to BEYOND to save the animation.
